Wednesday, November 30, 2011

Lovely Frankenstein's 24 Days of Christmas


Okay, I promise not to give any Scrooges a fat lip (tempting though it is) but I WILL post a new Christmas project daily from tomorrow until Christmas Eve. There will be lots of quick and easy DIY gift ideas, Christmas decor and the occasional recipe in there too. So stay tuned for this Halloween nut to show you how holly jolly she can be!

Sunday, November 27, 2011

I've been a busy (and not so bloggy) girl

Thanksgiving is done and the busy Black Friday/Small Business Saturday shopping is slowing down. Me? Oh you know, just finishing projects and binding :)

Thursday, November 24, 2011

Happy Thanksgiving

If you know me in real life, then you know I'm not a very sappy, sentimental person. I don't like talking about my feeeeelings and emotions in general, and I don't think I ever will. But hey, once in a blue moon, right?
Here it is, Thanksgiving. It seems cheap to me to profess our blessings and how thankful we are one day of the year because the holiday demands it, when we should be thankful every day for the people we share our lives with and for all the things we do have. For me it feels even cheaper when I think about the time this year that I've felt just completely stressed out, scared and hopeless. Yet I find myself feeling all gooshy and sentimental anyway.

2011 hasn't been the best of years for me and mine, but even so it's impossible to ignore all of the truly happy and wonderful things this year has brought. All things change - for better and for worse, through the choices we consciously or subconsciously make, or without our influence whatsoever. It's not always easy to ride that wave, but it is important to stop at the crests and gulleys and recognize that things could always be worse and to focus on the positives and not the negatives. Sometimes it's easier said than done, but it's always worth the effort, to focus on the good things in our lives and within ourselves.

So what am I thankful for?
My family - you stay with me when it feels like everyone else is walking away, and who keep me in check with reality. You boost my ego and keep me humble at the same time, and always keep me laughing.

My best friends, Lauren and Isabelle. You're the only 2 people (not related to me) who get my weirdo sense of humor, and that have the same affliction. You keep me sane, and kick me in the butt when I'm working too much (I need that too).

My Readers. You keep this blog fun, because I would have stopped months ago if I saw no one was reading it.

The fact that in this economy, I have 2 jobs. Not only that, but I have 2 really wonderful bosses that I seriously wouldn't trade (though, at the shop with Mom that goes without saying) and my co-workers are fantastic too.

Our customers. You keep me inspired and on my toes, and visiting with you is sincerely a good time.

My part in the shop and the quilting community. So many people can't say they are truly doing what they love and I feel blessed to even have a minor part to play in doing what I love.

Personal growth. I am thankful to have learned how to use stress as a learning tool instead of letting it defeat me, even though I have much more to learn in that regard. I'm thankful to have grown more and become stronger as a person, and to have just that little bit more confidence in who I am, flaws and all.


I guess I'm just thankful to be here at all and to still be standing, and to know the people I love so much are still standing too. Regardless of successes, failures, health or disease and between Health Care deprivation, student loans, bailouts, scandals, conspiracies and Occupy protests ...we're all going to manage just fine.
Happy Thanksgiving.

Friday, November 18, 2011

Product Review: Sewline Quick Thru Needle Threader

Sewline is a company that specializes in sewing and quilting notions, with their most well known product being the mechanical Sewline Fabric Pencil. They are growing more and more popular as a company, as people look for new gadgets to make their quilting process easier. Their pencils are indeed absolutely fabulous, but that's a review for another day. This time around I'll be reviewing their Quick Thru Needle Threader.

This guy.

What a fabulous idea! it looks like a lipstick case, but when you pull the top down, there's a needle threader! And, if you pull the bottom lid off, there's a little case to hold spare needles. What a cute little package, huh? That being said, Sewline, I'm taking you to the woodshed. While this is a great idea for a product, it would be so much nicer if it actually functioned properly. This thing is not well constructed at all. The threading piece is extremely fragile and it was my experience, as well as that of several of our shop's customers, that it broke after less than 10 uses. Now I was gentle with it, and I know my customers (this group of ladies have been handstitching for decades, I know they know how to use a needle threader properly) were too, yet this thing broke.

Thinking we might have recieved a bad shipment of threaders, we called the company to let them know that, "Hey, just so you know all of your threaders broke for us and our customers, so we have reason to believe that we recieved a shipment of defective threaders. What are you going to do about it for us?" Get ready for this: They told us that they knew they were defective when they sent them out, but we're in luck because they're selling replacement cartridges for us to buy to sell to our customers at $5. Basically, in order for the $10ish threader to work like it should have when it was purchased, our customers were expected by the company to buy a $5 replacement cartridge AND the company knew about it. Pretty sneaky on Sewline's part and that's a $15 threader now! Needless to say, we didn't charge for the replacement cartridge because that's pretty bogus. 

As an idea, this product is great. If our experience with the threaders involved them being functional right out of the package, I'd give this product 4 stars, easy. But that was not the case, and so the Sewline Quick Thru Needle Threader gets:


Thursday, November 17, 2011

Thursday, It's Technical: Optimizing your Sewing Room

This is a confessional. I, Lauren, have an out of control sewing room. Seriously. It's ridiculous. Seven months ago, I had a functional sewing room with a sewing table and shelves and a closet and it was all reasonable organized. Well. My best friend moved in in April and she's lucky I like her because there went my sewing room, and entire room got relegated to oh, a 6'x12' "breakfast nook." But I got the little place organized and optimized, and until my fabric shelves broke and spilled everything everywhere, I ran a tight ship there.

So if you're thinking of organizing (or re-organizing as the case may be) your sewing room, first of all, consider the following questions:

- How large is your proposed sewing room?
- Will it be used for more than just sewing (scrapbooking, jewelry making, etc.)
- What is the lighting like in there?
- Will my typical organization methods work in this space?

Those questions will help guide you in how to best use what you have and what kind of supplementary items you may need or want. If your sewing room is large, you probably have room for different work stations - a cutting area, a sewing area, a pressing area, and then areas for other crafts like scrapbooking and the like (if that's your game). But if you're like me and have a teeny-tiny, eeensy-weensy sewing room, your objective will be how to most efficiently use the space you have for all of your sewing and/or crafting supplies.

If your lighting is mainly coming from one source (an overhead light, for example) then consider adding task lighting for your projects. If it comes from multiple sources, like an overhead light and a large window, be careful of where you place your fabric so it doesn't get sun bleached.

Consider how you organize in the rest of your home. Are you by nature neat and organized - do you label and categorize? Or, are you (like me) a whirlwind with a haphazard and case-by-case methodology? Set up your sewing room to play to your strengths. If you have a tendency to stack things out where you can see them, then shelves are a good thing to consider. If you like things put away, then a chest of drawers might be your best bet.

Once you figure out the larger furniture and placement oriented aspects of getting everything squared away, here are some ideas get things neat and accessible:

- Use wall space to your advantage. Wall mounted shelving, hooks, pegboards, bulletin boards, design walls and wall mounted magazine racks are all great ways to keep things organized and out in the open, yet taking up zero valuable floor space.

- If you are lucky enough to have a closet in your sewing room, take advantage of that space by housing larger or less-used items away in there, either on the shelves under the bar or hanging on hangers. The closet is a great place for batting, large ironing boards, sewing machines you seldom use...using pants hangers (the kind with the squeeze clips) you could clip up and away less-used rulers and templates as well as large pattern pieces that just will not fold back up, or pieces of material (like pleather, vinyl, laminate, wool) that are difficult to fold or shouldn't be folded.

- Rolling carts or small, portable kitchen islands are great for housing your projects and/or supplies and they are easily rolled out of the way when you aren't using them.

- Cabinets are perfect for closed storage, but think about how you use them. Once the shelves inside are filled, use the inside of the doors too! If the space between the door and shelves is wide enough, put some nails in and hang small items. If it's not, use it to hang fabric swatches with the selvedge on from your latest project (in case you run out of fabric, you'll know what to get) or put up pictures of your favorite color ways to inspire you. It's your very own Piniterest in your home!

- Wall mounted thread racks are Godsends. See your thread right away without having ro rummage through a bin.

- Store away your scraps in shoeboxes. The cardboard breathes better than plastic, so you don't run that remote risk of mildew (if you're worried about that), plus they're something you probably already have around. Organize as you see fit - by scrap size, color, print style, whatever - and stow away.

- Foam core or comic book inserts are great folding aids. Wrap your fabric around those and you'll have your own mini bolt of fabric for whatever size cut. It keeps more fabric more compact than just folding and you can set it on end, fitting more fabric on your shelf/in your bin than folding and stacking.

- Labelling the yardage amount on your cut pieces and scraps (if it's not readily apparent) is a lot of work but if you work out of your stash more often than not, it's a good way to know which fabrics will work for your project and which won't.

- Hang dowel rods on the wall or inside a cabinet to keep your ribbons and spooled items out of the way and untangled

- Small plastic baggies are great for housing buttons and other embellishments because they stay contained, and most of those baggies have a hole in the top above the closure so they can be hung on a pegboard for easy identification and access.

- Put patterns in binder sleeves in a binder. One large binder takes up less space than the same amount "ziplocked" bags the patterns come in with the pattern inside. Plus, using dividers or sticky tabs, you can quickly find the pattern you need without rifling through a large box of patterns.

- Hardware stores carry wall mountable storage drawers, used there to house screws, nails and all that small stuff. Use one in your sewing room, wall mounted or not, to house your sewing machine needles, buttons, embroidery floss, bobbins etc. Each drawer can be labelled too!

 - Portable toolboxes are great to house small notions of a similar type out of the way yet easily reachable. They're great for buttons, clothing closues (like hook-and-eyes, zippers, snaps), beads and other embellishments, sewing machine parts, etc.

- Use the ArtBin project bins to keep current projects, class projects, Block of the Month programs and UFOs organized

- Mint tins and the like are great for storing broken needles and bent pins safely contained.

- Magnetic bulletin boards with the magnetic tins are perfect for storing buttons, pins, needles, in a more visually pleasing way.

- Use a dry erase board to write up your project list, items you need to buy at the quilt shop the next time you're there, cutting instructions, or other notes to yourself as you work.

There are a million and one different ways to organize your sewing room, and it takes trial and error to figure out what works best for you. I hope this has given you some food for thought and helped you with adding to the great ideas you all ready have!

Sources and Other Links
All People Quilt
TipNut

Tuesday, November 15, 2011

Product Review: Heat n' Bond Feather Weight


If you do fusible applique, then at the very least you have heard of the brand Heat n' Bond, if not used it yourself. There are a few good fusibles out there on the market, and I have found through trial and error that Heat n' Bond products work the best for me. Not that the others, like Steam-A-Seam or MistyFuse, don't work well; they do, but I like the results I get with Heat n' Bond better.

Anyway, so Heat n' Bond has developed and released their response to MistyFuse and the other very light fusibles, which is their Feather Weight brand. We got it in at the shop for Carol and I, since we do a lot of applique, to test and see what we thought. Our opinions differ. I like Feather Weight, and actually I prefer it to Heat n' Bond Lite (my previous staple). I concede, however, that Feather Weight has some...idiosyncrasies. But once you know how to deal with and counteract those quirks, it's a wonderful, wonderful thing to have on hand.

Feather Weight really is just that...it is light as a feather! I have a tendency to go for patterns and designs that pile layer upon layer, and so the thinner the fusible, the better. But like I said, there are some idiosyncrasies. When the fusible comes off the roll, Heat n' Bond has affixed the plastic instruction sheet to the inside (fusible) side of the roll. The adhesive is so thin that trying to pull that instruction sheet off without tearing a wide swath from the middle is both an exercise in patience and dexterity. I have found it difficult not to lose an inch or two from the end that I peel the sheet off of, but I have also found that once you get it started and it stops tearing, it can be ripped right off like usual. Also, if you pull the sheet off just a few inches past where you're planning to cut your piece off, the fusible won't tear when you go for another piece and have to tear the instructions off again.

Speaking of instructions, this is the one fusible where I do in fact follow them. You absolutely cannot use a higher iron setting on this stuff, because the fusible is so thin it'll just dissolve away if you do. It on;y takes a second or two to adhere it to your fabric, but once it's on there, it's fabulous. Because of its thinness, it's able to be repositioned on your applique. The drawback on that thinness though is that repeated ironing, when you assemble your applique, makes the fusible dissovle a little more each time so you may find your corners coming up as you stitch everything down if you're working on a more intricate project.

So with Heat n' Bond Featherweight, its assets are also its liabilities. I have found, however, that it is more beneficial than not and it's definitely a product worth giving a try.

I give Heat n' Bond Feather Weight...

Wednesday, November 9, 2011

Two Finished Projects in Two Days. Bam!

Whelp, I have spent the last two nights sewing my booty off and here's what I came up with:

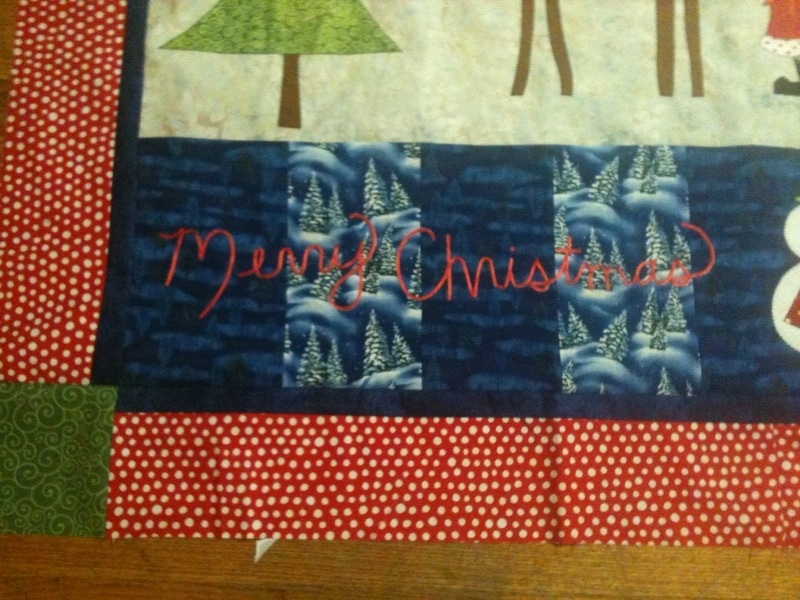
Woo! It's done! The one complaint I have about Piece O'Cake's pattern is that there really wasn't a helpful placement guide and so just in eyeballing how far away to put the reindeer and Santa from the seam I ended up placing them too low when I gauged how far down to put the large tree. There ended up being a huge white space and it looked weird I thought, so I just filled in with more trees. I like the end result there! and the green squares in the corners aren't part of the pattern either, I just thought it would be an easy way to bring the green out without it being overpowering.


It also called for thin ric-rac for the lettering, but gave no placement guide for the letters, so I just used Hot Fix ribbon and my own sloppy cursive. It's whimsical, dammit! :D


Here is another one from BJ Designs, another of my favorites. It's just a quick and cute 20" by 20" mat.

Here's the whole kit 'n caboodle. It's hard to see here, but the "white" is actually a light gold with gold metallic snowflakes on it. It's not as bright and glaring in person as it is in the photo. Thanks, fluorescent lighting!

Here's a closer shot. See? The "white" is actually gold. Not quite as intense. But the snowflake is Michael Miller's Fairy Frost with the the glitter. Oooh....sparkly.


Let's see. Next up I have another mat like the snowflake (but it's a candy cane instead) and yet another from BJ Designs that's a large wonky Christmas tree. I'll get a picture posted of that soon, once I get it all together :-)