Michelle over at Michelle's Romantic Tangle has got the cutest Jack o' Lantern Quilt ever! I love the goofy little faces. She has a tutorial over there complete with a video (fancy!). So if you want a cute quilt for next year, this is a good bet! CLICK HERE to get to the tutorial. Thanks for sharing, Michelle!
Showing posts with label Tutes. Show all posts
Wednesday, October 19, 2011
Lovely Frankenstein's 31 Days of Halloween: Pumpkin Carving Quilt!
Michelle over at Michelle's Romantic Tangle has got the cutest Jack o' Lantern Quilt ever! I love the goofy little faces. She has a tutorial over there complete with a video (fancy!). So if you want a cute quilt for next year, this is a good bet! CLICK HERE to get to the tutorial. Thanks for sharing, Michelle!
Wednesday, October 12, 2011
Lovely Frankenstein's 31 Days of Halloween: Spiderweb Tablerunner Tutorial
I love textural tablerunners, and this lovely spiderweb tablerunner from The Crafty Cupboard delivers. Use felt or wool for your spiderweb, and fabric of your choice to put behind it. Neat!
CLICK HERE for the tutorial. Thanks Melanie!
Friday, July 1, 2011
Top 5 Techniques that Look like Fun (but I haven't tried yet...)
I've said it before and I'll say it again...I'm hopeless addicted to the wild, weird world of quilting. Heck, if that's not apparent all ready, then perhaps I've been understating things (though, really not something I'll ever be accused of doing...ask my family/friends, I'm a spaz!). So while I've been piecing and appliqueing and quilting to my little heart's content, I've seen some other techniques that I really want to try...but haven't (yet). So, here they are (in no particular order of course):
Top 5 Techniques that Look like Fun (but I haven't tried yet...)
5. English Paper Piecing
I've all ready tried regular paper piecing, but this English Paper Piecing thing keeps rearing its head. Every now and then at the shop, someone will come in looking for english paper piecing supplies, and as a matter of fact, yesterday Loretta Orsborn was in our shop teaching a class, and she showed Mom and I an English Paper Piecing project she was working on and let me tell 'ya....it was cool! It made me want to try it, maybe not on the larger scale she was doing it at, but maybe a wall hanging? For a hand-sewing method, a wall hanging is probably all my attention span can handle. But it looks like a really simple technique and I really love how precise it is without seeming to be overly complicated. It looks like the prep actually takes the longest!
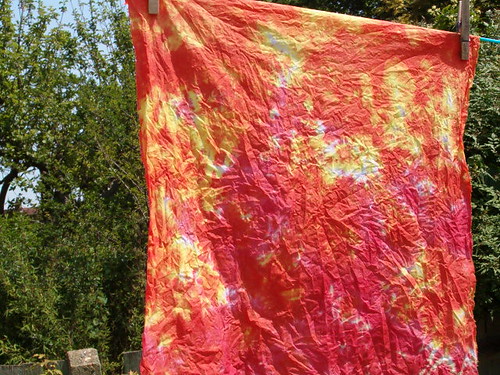
I flipped right out when I saw this...you can dye your own fabric, pretty much mess free if you do it correctly, with the ice cubes in your freezer and powder dyes. What the heck?! I love the results! It's similar to tye-dye but without being overly ... tye-dye-ish, if that makes sense. This is a lot less planned. With tie-dye, you can make certain designs based on how to fold or twist the fabric and tie with rubber bands, and you apply the color directly where you want it - with the exception of the twist of the fabric, you pretty much know where the colors will be and how they will interact (since the dye is liquid, you see how it'll blend right away). With Ice Dyeing, the dye is a powder and rests on top of the fabric and dissolves and falls where it will as the ice melts - you can kind of guess where you want a particular color to be but ultimately it just goes where it goes and there is no "planned" pattern to it. It doesn't lend itself to the twisting and tying that tie-die does, because you need the looser folds to allow the powder the seep through. I couldn't find a video tutorial for this, but if you click on the "Ice Dyeing" link, that is the best tutorial I have seen for it.
3. Hand Embroidery
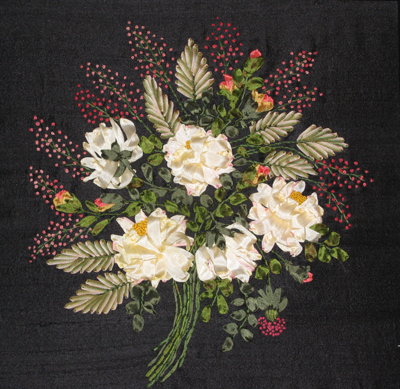
Okay, so this one isn't ENTIRELY true. I have tried it. All I've done is a back stitch and an absolutely pathetic stem stitch (gotta work on that!). But have a looksie at the above link and check out these video tutes...how flippin' cool?! Embroidery is always a nice touch when embellishing a quilt - it can be whatever you want it to be and while it can look very modern with clean lines, it gives just a hint of the traditional which is really quite nice. I think the coolest part about embroidery is the fact that it has been done for literally thousands of years - we do it now, the Victorians did it, the ancient Chinese and ancient Egyptians did it, the medieval cultures did it and there is even evidence that early man had the ability to do it as well. Plus, there is no denying that hand embroidery can be absolutely elegant or wonderfully simple, so it caters to all skill levels.
4. Set-In Seams
Fine, fine. This one isn't all the way true either. I've tried this and you should have heard the fit I had. This is just the most ridiculous thing, it really is (okay, fine, so I'm still a little bitter). Set-In seams and Y-seams are pretty much the same thing far as I can tell, and using this technique can yield some pretty incredible results.. The thing I want to do with this, actually, is my mother's specialty - the Lone Star Quilt. She can practically do these in her sleep, Set-In Seams and all and have it turn out practically perfect. It comes with experience (and *groan* paaaaatience) I think. I'me working on the experience thing, but I think the patience with myself and with my projects is something that I'll forever lack. Anyway, maybe once my bitterness and rage (Hyperbolic much? Geez.) subside with these stupid seams I'll give it another go and make a sweet Lone Star!
5. Reverse Applique
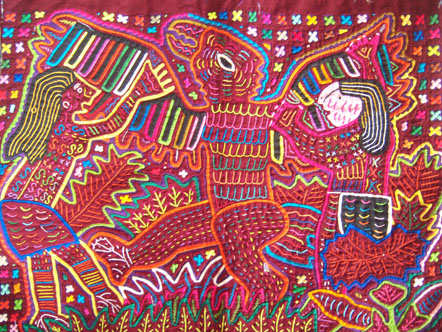
Oh my goodness, have you ever seen a quilt all done up using this technique? It can range from cutesy to complicated and can be used as the focus technique or as embellishment. No matter which way you cut it, it's neat! I remember in Miss Parker's 7th grade art class, we had to do this technique using paper and an X-Acto knife to emulate (what is probably the most famous example of reverse applique) the Molas made by the Kuna people of Panama and Colombia. Their work is absolutely amazing. It's bright, it's intricate ...often imitated but never equalled. Aside from the Molas, this is just a funt hing to try and I think I (eventually) will!
Top 5 Techniques that Look like Fun (but I haven't tried yet...)
5. English Paper Piecing
I've all ready tried regular paper piecing, but this English Paper Piecing thing keeps rearing its head. Every now and then at the shop, someone will come in looking for english paper piecing supplies, and as a matter of fact, yesterday Loretta Orsborn was in our shop teaching a class, and she showed Mom and I an English Paper Piecing project she was working on and let me tell 'ya....it was cool! It made me want to try it, maybe not on the larger scale she was doing it at, but maybe a wall hanging? For a hand-sewing method, a wall hanging is probably all my attention span can handle. But it looks like a really simple technique and I really love how precise it is without seeming to be overly complicated. It looks like the prep actually takes the longest!
4. Ice DyeingI flipped right out when I saw this...you can dye your own fabric, pretty much mess free if you do it correctly, with the ice cubes in your freezer and powder dyes. What the heck?! I love the results! It's similar to tye-dye but without being overly ... tye-dye-ish, if that makes sense. This is a lot less planned. With tie-dye, you can make certain designs based on how to fold or twist the fabric and tie with rubber bands, and you apply the color directly where you want it - with the exception of the twist of the fabric, you pretty much know where the colors will be and how they will interact (since the dye is liquid, you see how it'll blend right away). With Ice Dyeing, the dye is a powder and rests on top of the fabric and dissolves and falls where it will as the ice melts - you can kind of guess where you want a particular color to be but ultimately it just goes where it goes and there is no "planned" pattern to it. It doesn't lend itself to the twisting and tying that tie-die does, because you need the looser folds to allow the powder the seep through. I couldn't find a video tutorial for this, but if you click on the "Ice Dyeing" link, that is the best tutorial I have seen for it.
3. Hand Embroidery
Okay, so this one isn't ENTIRELY true. I have tried it. All I've done is a back stitch and an absolutely pathetic stem stitch (gotta work on that!). But have a looksie at the above link and check out these video tutes...how flippin' cool?! Embroidery is always a nice touch when embellishing a quilt - it can be whatever you want it to be and while it can look very modern with clean lines, it gives just a hint of the traditional which is really quite nice. I think the coolest part about embroidery is the fact that it has been done for literally thousands of years - we do it now, the Victorians did it, the ancient Chinese and ancient Egyptians did it, the medieval cultures did it and there is even evidence that early man had the ability to do it as well. Plus, there is no denying that hand embroidery can be absolutely elegant or wonderfully simple, so it caters to all skill levels.
4. Set-In Seams
Fine, fine. This one isn't all the way true either. I've tried this and you should have heard the fit I had. This is just the most ridiculous thing, it really is (okay, fine, so I'm still a little bitter). Set-In seams and Y-seams are pretty much the same thing far as I can tell, and using this technique can yield some pretty incredible results.. The thing I want to do with this, actually, is my mother's specialty - the Lone Star Quilt. She can practically do these in her sleep, Set-In Seams and all and have it turn out practically perfect. It comes with experience (and *groan* paaaaatience) I think. I'me working on the experience thing, but I think the patience with myself and with my projects is something that I'll forever lack. Anyway, maybe once my bitterness and rage (Hyperbolic much? Geez.) subside with these stupid seams I'll give it another go and make a sweet Lone Star!
5. Reverse Applique
Oh my goodness, have you ever seen a quilt all done up using this technique? It can range from cutesy to complicated and can be used as the focus technique or as embellishment. No matter which way you cut it, it's neat! I remember in Miss Parker's 7th grade art class, we had to do this technique using paper and an X-Acto knife to emulate (what is probably the most famous example of reverse applique) the Molas made by the Kuna people of Panama and Colombia. Their work is absolutely amazing. It's bright, it's intricate ...often imitated but never equalled. Aside from the Molas, this is just a funt hing to try and I think I (eventually) will!
Wednesday, February 23, 2011
I'm back...I may not be all there, but at least I'm back...
So I'm up to my EYEBALLS in projects. Sunbonnet Sue. Australian Quilter's Companion Quilt. My own ideas. A couple gifts that need done. A quilt from last freakin' year. So today MOm decides I need a new project....to make a reusab;e shopping bag from a pattern she got off of AllPeopleQuilt.com.
The bag I made...also, this site is fab!
Cute bag. Cute project. Pattern leaves something to be desired. It's an open domain pattern (meaning free to the public and not under copyright in MOST cases), and while open domain patterns are awesome ...sometimes they can have a few kinks in them, moreso than published and copyrighted patterns. But I'll get to that.
This bag is not at all meant to go over the shoulder...definitely a bag you'd want to just carry. The size (~16" wide) would be absolutely perfect for a trip to a farmer's market, but it IS reversable so it can be used as a plain ol' purse too. So here's what I learned while making this bag:
1. Read, look at pictures, re-read and re-examine pictures before cutting a thing.
2. Do NOT cut your fabric down to 16"x 42". If you are even an eight of an inch innaccurate in your cutting, you'll be hard pressed to get your template to fit your fabric. Cuyt the half yard from your fabric of choice, fold as per the instructions and just cut your template from the half yard. Yes, it does create a little waste, but it's better than finding yourself short fabric in your seam allowances.
3. The pattern doesn't call for any kind of interfacing (like, Pellon, Timtex, fusible fleece, etc). If you intended to carry anything with some heft to it (like cans), you will probably want to add some kind of interfacing to it. For my first bag, I used fusible fleece and a lightweight Pellon interfacing. This will stand up to some abuse for sure, but next time I think I'll just opt for the lightweight interfacing on both pieces, since the fusible fleece made it bulky and difficult to turn right sides out. But remember, if you use interfacing on your outer piece, you'll want to use it on your lining if you choose to use this as a reusable grocery bag. The handles are a little awkward to be used as a purse, but if you wanted to use it as a purse, then using interfacing on the lining isn't 100% necessary.
4. I found that top-stitching the curved handles BEFORE assembling the rest of the bag helped them lay flatter, and it's just a nice little touch. Be sure to have your top thread complement your outer fabric, and ytour bobbin thread complement the lining, because your stitches WILL be visible even if you don't use the reverse.
So this is after step...3 I think...it was VERY difficult to turn right sides out. See that really wide side? THAT had to be pulled through that very narrow center (which will end up being the handle). Like I said, the fleece made that harder than it needed to be, but if you choose to use the fleece, hemostats (like the unholy lovechild between a pair of scissors and a pair of pliers...Google it) will help you a LOT during this step.
Dont mind my mirror picture. Trust me, you don't want to see that state of my sewing area. It's like a tornado hit...only that tornado is my own very dishevled and chaotic creative process. But I s'pose as long as I can find what I need that all that matters...now where my rotary cutter went, I haven't the foggiest. lol. I digress. This is what I chose for my outer piece. As you can see, it's a decent sized bag.
This is the lining I chose. Since it's reversable, I wanted something complementary, but something that could stand on its own should I choose to have the lining become the outer piece. Big ol' fern leaves. I LOVE that minty color.
So that's it for now. I neglected to square up the bottom, and I didn't want to tearout my stitches AGAIN (ugh) so I left it just plain bag-style. The next one I'll use the thinner interfacing on both sies, then you know, follow the pattern better. lol. C'est la Vie. This will be in the shop soon so next time you're in...you'll see it somewhere :-)
The bag I made...also, this site is fab!
Cute bag. Cute project. Pattern leaves something to be desired. It's an open domain pattern (meaning free to the public and not under copyright in MOST cases), and while open domain patterns are awesome ...sometimes they can have a few kinks in them, moreso than published and copyrighted patterns. But I'll get to that.
This bag is not at all meant to go over the shoulder...definitely a bag you'd want to just carry. The size (~16" wide) would be absolutely perfect for a trip to a farmer's market, but it IS reversable so it can be used as a plain ol' purse too. So here's what I learned while making this bag:
1. Read, look at pictures, re-read and re-examine pictures before cutting a thing.
2. Do NOT cut your fabric down to 16"x 42". If you are even an eight of an inch innaccurate in your cutting, you'll be hard pressed to get your template to fit your fabric. Cuyt the half yard from your fabric of choice, fold as per the instructions and just cut your template from the half yard. Yes, it does create a little waste, but it's better than finding yourself short fabric in your seam allowances.
3. The pattern doesn't call for any kind of interfacing (like, Pellon, Timtex, fusible fleece, etc). If you intended to carry anything with some heft to it (like cans), you will probably want to add some kind of interfacing to it. For my first bag, I used fusible fleece and a lightweight Pellon interfacing. This will stand up to some abuse for sure, but next time I think I'll just opt for the lightweight interfacing on both pieces, since the fusible fleece made it bulky and difficult to turn right sides out. But remember, if you use interfacing on your outer piece, you'll want to use it on your lining if you choose to use this as a reusable grocery bag. The handles are a little awkward to be used as a purse, but if you wanted to use it as a purse, then using interfacing on the lining isn't 100% necessary.
4. I found that top-stitching the curved handles BEFORE assembling the rest of the bag helped them lay flatter, and it's just a nice little touch. Be sure to have your top thread complement your outer fabric, and ytour bobbin thread complement the lining, because your stitches WILL be visible even if you don't use the reverse.
So this is after step...3 I think...it was VERY difficult to turn right sides out. See that really wide side? THAT had to be pulled through that very narrow center (which will end up being the handle). Like I said, the fleece made that harder than it needed to be, but if you choose to use the fleece, hemostats (like the unholy lovechild between a pair of scissors and a pair of pliers...Google it) will help you a LOT during this step.
Dont mind my mirror picture. Trust me, you don't want to see that state of my sewing area. It's like a tornado hit...only that tornado is my own very dishevled and chaotic creative process. But I s'pose as long as I can find what I need that all that matters...now where my rotary cutter went, I haven't the foggiest. lol. I digress. This is what I chose for my outer piece. As you can see, it's a decent sized bag.
This is the lining I chose. Since it's reversable, I wanted something complementary, but something that could stand on its own should I choose to have the lining become the outer piece. Big ol' fern leaves. I LOVE that minty color.
So that's it for now. I neglected to square up the bottom, and I didn't want to tearout my stitches AGAIN (ugh) so I left it just plain bag-style. The next one I'll use the thinner interfacing on both sies, then you know, follow the pattern better. lol. C'est la Vie. This will be in the shop soon so next time you're in...you'll see it somewhere :-)
Friday, February 18, 2011
Someone stop me before I try and embellish the wool before it's even off the sheep!
First things first. THANK YOU for all of your prayer for Carol and Randy. We love them both and we're glad Randy's surgery went well. A little love, light and positivity goes a long way.
Now onto your regularly scheduled programming...
I have to admit. I haven't been feeling too creative lately. The weather has been cruddy, I've been fighting an almost cold, MOm has the week off and I've been working my butt off. So when I get home, I march into my bedroom and do a runnign bellyflop onto the bed and do. not. get. up. I do all of my best work on my bed.
Wait a second. That came out WAY wrong. Let me rephrase.
I sit on my bed quite a lot. My bed is like most people's living room sofas. I have a TV in my room and it's in front of my bed, so why leave? I got my wool, I got my crosstitch, I got my embroidery...it's all good. That's that, and it is awesome.
So I keep trying to upload a video demo but that nonsense isn't working. lol. That's probably for the better...it had to have been the single most LAME video set up ever. I'm serious. It was on my bed (where I do all of my needle felting and crosstitch etc), on a plasic drawer, on my laptop, with my phone setting on all of the that, recording. Guh-het-toe.
Back to needle felting. It is so much fun...and I think I have a new fiber to be addicted to! Hooray texture! Here's a little trip into the basics of needle felting...and no, we do not have the tools or roving at the shop, but we DO have the hand dyed wool fabric.
That lump in the covers? Darwin thinks he's helping by "staying out of the way." Where was he? In my way, but being adorable cuddled by that ball of blue roving.
So how do you do it? Grab your wool fabric (cotton does NOT work with this, the weave is too tight for the roving to go through), place it on your felting mat and fanagle it into the shape you want and set it on the wool fabric. In a straight up and down motion, push your felting needle thorough the roving and the fabric until your roving sticks to the fabric.
Really, you can work this into any shape you want. That thin little line is a small piece of roving that I rolled into a line and punched in to the fabric to make it thinner.
This is the reverse side of the design. See how the roving gets pulled to the back? That's all because of the barbs on the needle. It ensure that it stays put, punchthe roving back through the front. That stuff is now "fused' to the fabric.
If you don't have roving, but you have the felting needles, you can felt 2 pieces of wool together. Punch the needle through the 2 layes, and ther eyou have it. That piece right there? Not going anywhere.And look at the nifty texture? How cute would that be to add to an accent pillow, a wall hanging, or an art quilt?
Or you can make little designs...great for applique, or if you have wool sweater or purse, you can embellish them with whatever you want!
So I'm pretty excited. It's pretty therapeutic, actually, and it's an instant result. You get to see your work pay off immediately, and who doesn't like that?
Now onto your regularly scheduled programming...
I have to admit. I haven't been feeling too creative lately. The weather has been cruddy, I've been fighting an almost cold, MOm has the week off and I've been working my butt off. So when I get home, I march into my bedroom and do a runnign bellyflop onto the bed and do. not. get. up. I do all of my best work on my bed.
Wait a second. That came out WAY wrong. Let me rephrase.
I sit on my bed quite a lot. My bed is like most people's living room sofas. I have a TV in my room and it's in front of my bed, so why leave? I got my wool, I got my crosstitch, I got my embroidery...it's all good. That's that, and it is awesome.
So I keep trying to upload a video demo but that nonsense isn't working. lol. That's probably for the better...it had to have been the single most LAME video set up ever. I'm serious. It was on my bed (where I do all of my needle felting and crosstitch etc), on a plasic drawer, on my laptop, with my phone setting on all of the that, recording. Guh-het-toe.
Back to needle felting. It is so much fun...and I think I have a new fiber to be addicted to! Hooray texture! Here's a little trip into the basics of needle felting...and no, we do not have the tools or roving at the shop, but we DO have the hand dyed wool fabric.
The tools. From the top, the bristled square thing is a needle felting "mat." It is what catches your needle as you do the felting, and helps insure that the needle doesn't snap. The white thing is a needle holder. It's foam core...like the posterboard. Fancy stuff, very technical. At the bottom we have our needle felting needle. It is extremely sharp and brittle.
Here is a close up of the needle. Granted, the pitcure quality isn't stellar, but you can kind of see the little burrs in the tip of the needle. This is what grips the roving and pulls it through the fabric. But do you see how thin the tip of that is? Yeah, that can snap if you don't felt properly. It's very thin, so it can get through the fabric, but that also makes it brittle.
Mmm, mmm, mmm. THAT is the wool roving. I have it plastic bags because I'm just plain persnickety and I didn't want the wool sticking to each other. The colors...oh this picture doesn't do them justice.
Here's a close up of that wool roving. Yum! This I bought from a gal named Heidi... Heidi's GORGEOUS wool roving... very nice lady and she's got some wonderful stuff. This magenta with the purple? Forget about it! Lovely.
It just peels right apart and you grab as much as you need for what you're doing. A little, believe it or not, goes a loooong way.
So how do you do it? Grab your wool fabric (cotton does NOT work with this, the weave is too tight for the roving to go through), place it on your felting mat and fanagle it into the shape you want and set it on the wool fabric. In a straight up and down motion, push your felting needle thorough the roving and the fabric until your roving sticks to the fabric.
Really, you can work this into any shape you want. That thin little line is a small piece of roving that I rolled into a line and punched in to the fabric to make it thinner.
This is the reverse side of the design. See how the roving gets pulled to the back? That's all because of the barbs on the needle. It ensure that it stays put, punchthe roving back through the front. That stuff is now "fused' to the fabric.
If you don't have roving, but you have the felting needles, you can felt 2 pieces of wool together. Punch the needle through the 2 layes, and ther eyou have it. That piece right there? Not going anywhere.And look at the nifty texture? How cute would that be to add to an accent pillow, a wall hanging, or an art quilt?
Or you can make little designs...great for applique, or if you have wool sweater or purse, you can embellish them with whatever you want!
So I'm pretty excited. It's pretty therapeutic, actually, and it's an instant result. You get to see your work pay off immediately, and who doesn't like that?
Subscribe to:
Posts (Atom)