(I'm not. You and I both know it)
Well...I can't say I've been up to much other than that Halloween quilt. I have no pictures right now, but I got all but 2 of my blocks fused down; now all I need to do is blanket stitch 'em! They're turning out super cute, and I'm very pleased with them. Hopefully I'll get some pictures posted in the next couple days.
Speaking of the next couple days...
This will probably be my last post until about August 9th or so - it's VACAY, BABY! I'll be in California for 2 weeks. It's finally hit me after a year and a half of having 2 time intensive jobs, and I've been burning out pretty hard, mentally and physically. So I need a break, and a road trip with my friend Megan down to CA fits the bill. I'll come back happy, relaxed and tan (and probably with a set or two of Mickey Mouse ears). I just wish Mom was able to have an extended break too, because she needs it even more than I do. [Hey "Dante," stay OUT of the store on your days off! You're not even supposed to be here today :)]
So if I post at all, it won't be quilt related...it'll probably be Disneyland and palm tree related.
Until then, have a happy and safe two weeks, and keep yourself in stitches!

Wednesday, July 27, 2011
Wednesday, July 20, 2011
'Tis the Season to be SPOOKY, part dos.
More pictures! I'm moving right along...of course, yesterday I had to take a break to go see Horrible Bosses with my roomate Lauren. Very, very funny movie, and I completely forgot how attractive Jason Bateman was until now. Woo!
Anyway, on to the pictures...


Right-o! So that's where I'm at there. Tonight I'm thinking I'll start on the houses and the flying geese. Should be cute! 
Anyway, on to the pictures...

The graveyard is finished! My applique is definitely getting better...it dang well should after all those curves and points. Good grief.

Can you see that purple? Yeah, me neither. So I decided to outline the lettering in the Hot Fix Ribbon. Not easy to do with a regular sized iron!

MUCH better. The purple pops much more in real life though.

Yeah, I always intended to applique it down. My thought was that with the ribbon plus the blanket stitch, it would look like stripes. Success, I feel!

Cute little candy corns. I decided that in all the pieced blocks, instead of doing solid black, I'd to a nice polka dot. Actually, this quilt is filled with polka dots. Whaaat? I like polka dots... <3

Ghosties! Their faces will be embroidered on later. Right now, they have such blank expressions! Oh yeah, gotta love the [candy]corny jokes! I'm on a roll! lol

Just a basic Card Trick....that took me 3 (non-consecutive) hours to do...some moron *ahem* kept cutting it wrong.

This one is for "Pearl's Potions" I'll probably re-name it. I think this one is my favorite so far!
Thursday, July 14, 2011
'Tis the Season to be SPOOKY
My blog has been neglected these past 2 weeks. I have no excuse. Can I just get away with it for a slap on the wrist?
So, it's July and you know what that means...I'm gearing up for Halloween! For those of you that don't know me, and who have ignored to title and design of this blog, to say that I'm a Halloween freak is somewhat of an understatement. I LOVE IT. Real bad. Yeah, as much as I love Christmas (and, oh, I do) I have to say I love Halloween more.
Be that as it may, the other afternoon, we got our Halloween patterns in, and knowing full well that I'd freak right out about it, Mom showed me Booville:
![]()
How stinkin' adorable is that?!?! I love it and naturally, that means I have to do the sample for the shop. Ow, ow, twist my arm, right? lol. So I have my fabrics and everything picked out and now I'm beginning the process. I have 3.5 chunks done: The Punkins house, the square-in-a-square row, the "Trick or Treat" block and I'm about halfway through appliqueing the graveyard together.
![]()
![]()
![]() This is the graveyard block in progress. Holy ishballs, Batman, it's a lot of teeny curves and points. The way I see it is at least I'm getting practice on my machine blanket stitch between this and the lettering...
This is the graveyard block in progress. Holy ishballs, Batman, it's a lot of teeny curves and points. The way I see it is at least I'm getting practice on my machine blanket stitch between this and the lettering...
So, it's July and you know what that means...I'm gearing up for Halloween! For those of you that don't know me, and who have ignored to title and design of this blog, to say that I'm a Halloween freak is somewhat of an understatement. I LOVE IT. Real bad. Yeah, as much as I love Christmas (and, oh, I do) I have to say I love Halloween more.
"Trick or Treat, Trick or Treat, Trick or Treat for Halloween!" I'm almost 24 and I STILL love this cartoon as much as when I was almost 6. I love that little witch! I feel like her at the beginning, dancing around on Halloween! :D
Be that as it may, the other afternoon, we got our Halloween patterns in, and knowing full well that I'd freak right out about it, Mom showed me Booville:

It's so cute I'm gonna DIE!

Punkins House. Well, it will be. The sign is suppose to say "Punkins." The Grammar Nazi in me will probably change that to "Pumpkins."

"...for Halloween!" Hehe. The blanket stitch here was a pain in the butt. Turned out cute though!

I can't wait to get the rest done!!
Friday, July 1, 2011
Top 5 Techniques that Look like Fun (but I haven't tried yet...)
I've said it before and I'll say it again...I'm hopeless addicted to the wild, weird world of quilting. Heck, if that's not apparent all ready, then perhaps I've been understating things (though, really not something I'll ever be accused of doing...ask my family/friends, I'm a spaz!). So while I've been piecing and appliqueing and quilting to my little heart's content, I've seen some other techniques that I really want to try...but haven't (yet). So, here they are (in no particular order of course):
Top 5 Techniques that Look like Fun (but I haven't tried yet...)
5. English Paper Piecing
I've all ready tried regular paper piecing, but this English Paper Piecing thing keeps rearing its head. Every now and then at the shop, someone will come in looking for english paper piecing supplies, and as a matter of fact, yesterday Loretta Orsborn was in our shop teaching a class, and she showed Mom and I an English Paper Piecing project she was working on and let me tell 'ya....it was cool! It made me want to try it, maybe not on the larger scale she was doing it at, but maybe a wall hanging? For a hand-sewing method, a wall hanging is probably all my attention span can handle. But it looks like a really simple technique and I really love how precise it is without seeming to be overly complicated. It looks like the prep actually takes the longest!
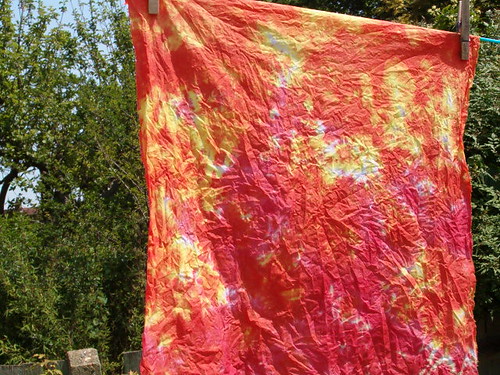
I flipped right out when I saw this...you can dye your own fabric, pretty much mess free if you do it correctly, with the ice cubes in your freezer and powder dyes. What the heck?! I love the results! It's similar to tye-dye but without being overly ... tye-dye-ish, if that makes sense. This is a lot less planned. With tie-dye, you can make certain designs based on how to fold or twist the fabric and tie with rubber bands, and you apply the color directly where you want it - with the exception of the twist of the fabric, you pretty much know where the colors will be and how they will interact (since the dye is liquid, you see how it'll blend right away). With Ice Dyeing, the dye is a powder and rests on top of the fabric and dissolves and falls where it will as the ice melts - you can kind of guess where you want a particular color to be but ultimately it just goes where it goes and there is no "planned" pattern to it. It doesn't lend itself to the twisting and tying that tie-die does, because you need the looser folds to allow the powder the seep through. I couldn't find a video tutorial for this, but if you click on the "Ice Dyeing" link, that is the best tutorial I have seen for it.
3. Hand Embroidery
Okay, so this one isn't ENTIRELY true. I have tried it. All I've done is a back stitch and an absolutely pathetic stem stitch (gotta work on that!). But have a looksie at the above link and check out these video tutes...how flippin' cool?! Embroidery is always a nice touch when embellishing a quilt - it can be whatever you want it to be and while it can look very modern with clean lines, it gives just a hint of the traditional which is really quite nice. I think the coolest part about embroidery is the fact that it has been done for literally thousands of years - we do it now, the Victorians did it, the ancient Chinese and ancient Egyptians did it, the medieval cultures did it and there is even evidence that early man had the ability to do it as well. Plus, there is no denying that hand embroidery can be absolutely elegant or wonderfully simple, so it caters to all skill levels.
4. Set-In Seams
Fine, fine. This one isn't all the way true either. I've tried this and you should have heard the fit I had. This is just the most ridiculous thing, it really is (okay, fine, so I'm still a little bitter). Set-In seams and Y-seams are pretty much the same thing far as I can tell, and using this technique can yield some pretty incredible results.. The thing I want to do with this, actually, is my mother's specialty - the Lone Star Quilt. She can practically do these in her sleep, Set-In Seams and all and have it turn out practically perfect. It comes with experience (and *groan* paaaaatience) I think. I'me working on the experience thing, but I think the patience with myself and with my projects is something that I'll forever lack. Anyway, maybe once my bitterness and rage (Hyperbolic much? Geez.) subside with these stupid seams I'll give it another go and make a sweet Lone Star!
5. Reverse Applique
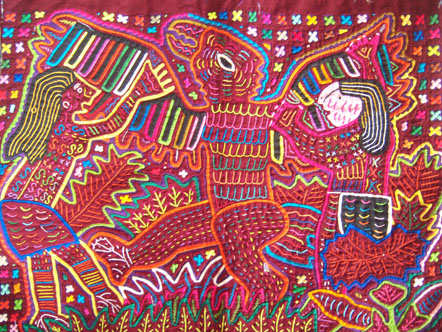
Oh my goodness, have you ever seen a quilt all done up using this technique? It can range from cutesy to complicated and can be used as the focus technique or as embellishment. No matter which way you cut it, it's neat! I remember in Miss Parker's 7th grade art class, we had to do this technique using paper and an X-Acto knife to emulate (what is probably the most famous example of reverse applique) the Molas made by the Kuna people of Panama and Colombia. Their work is absolutely amazing. It's bright, it's intricate ...often imitated but never equalled. Aside from the Molas, this is just a funt hing to try and I think I (eventually) will!
Top 5 Techniques that Look like Fun (but I haven't tried yet...)
5. English Paper Piecing
I've all ready tried regular paper piecing, but this English Paper Piecing thing keeps rearing its head. Every now and then at the shop, someone will come in looking for english paper piecing supplies, and as a matter of fact, yesterday Loretta Orsborn was in our shop teaching a class, and she showed Mom and I an English Paper Piecing project she was working on and let me tell 'ya....it was cool! It made me want to try it, maybe not on the larger scale she was doing it at, but maybe a wall hanging? For a hand-sewing method, a wall hanging is probably all my attention span can handle. But it looks like a really simple technique and I really love how precise it is without seeming to be overly complicated. It looks like the prep actually takes the longest!
4. Ice DyeingI flipped right out when I saw this...you can dye your own fabric, pretty much mess free if you do it correctly, with the ice cubes in your freezer and powder dyes. What the heck?! I love the results! It's similar to tye-dye but without being overly ... tye-dye-ish, if that makes sense. This is a lot less planned. With tie-dye, you can make certain designs based on how to fold or twist the fabric and tie with rubber bands, and you apply the color directly where you want it - with the exception of the twist of the fabric, you pretty much know where the colors will be and how they will interact (since the dye is liquid, you see how it'll blend right away). With Ice Dyeing, the dye is a powder and rests on top of the fabric and dissolves and falls where it will as the ice melts - you can kind of guess where you want a particular color to be but ultimately it just goes where it goes and there is no "planned" pattern to it. It doesn't lend itself to the twisting and tying that tie-die does, because you need the looser folds to allow the powder the seep through. I couldn't find a video tutorial for this, but if you click on the "Ice Dyeing" link, that is the best tutorial I have seen for it.
3. Hand Embroidery
Okay, so this one isn't ENTIRELY true. I have tried it. All I've done is a back stitch and an absolutely pathetic stem stitch (gotta work on that!). But have a looksie at the above link and check out these video tutes...how flippin' cool?! Embroidery is always a nice touch when embellishing a quilt - it can be whatever you want it to be and while it can look very modern with clean lines, it gives just a hint of the traditional which is really quite nice. I think the coolest part about embroidery is the fact that it has been done for literally thousands of years - we do it now, the Victorians did it, the ancient Chinese and ancient Egyptians did it, the medieval cultures did it and there is even evidence that early man had the ability to do it as well. Plus, there is no denying that hand embroidery can be absolutely elegant or wonderfully simple, so it caters to all skill levels.
4. Set-In Seams
Fine, fine. This one isn't all the way true either. I've tried this and you should have heard the fit I had. This is just the most ridiculous thing, it really is (okay, fine, so I'm still a little bitter). Set-In seams and Y-seams are pretty much the same thing far as I can tell, and using this technique can yield some pretty incredible results.. The thing I want to do with this, actually, is my mother's specialty - the Lone Star Quilt. She can practically do these in her sleep, Set-In Seams and all and have it turn out practically perfect. It comes with experience (and *groan* paaaaatience) I think. I'me working on the experience thing, but I think the patience with myself and with my projects is something that I'll forever lack. Anyway, maybe once my bitterness and rage (Hyperbolic much? Geez.) subside with these stupid seams I'll give it another go and make a sweet Lone Star!
5. Reverse Applique
Oh my goodness, have you ever seen a quilt all done up using this technique? It can range from cutesy to complicated and can be used as the focus technique or as embellishment. No matter which way you cut it, it's neat! I remember in Miss Parker's 7th grade art class, we had to do this technique using paper and an X-Acto knife to emulate (what is probably the most famous example of reverse applique) the Molas made by the Kuna people of Panama and Colombia. Their work is absolutely amazing. It's bright, it's intricate ...often imitated but never equalled. Aside from the Molas, this is just a funt hing to try and I think I (eventually) will!
Subscribe to:
Posts (Atom)