Showing posts with label Free Motion. Show all posts

Thursday, November 7, 2013

Free Motion Quilting Cheats!

In the past few months, I have been doing a lot of my own free motion quilting, whereas I hadn't before. Unfortunately, the professional quilter I gave quilts to the most was out of commission for a little bit, and with my other preferred quilter having quite the backlog, I decided I should probably try and do my own work.  I mean, I'm using a machine that can do it, and I do have some free motion experience, so why not, right?  I figured the pieces would be nice and high on the wall at the shop where no one could see all the mistakes and the uneven stitches, etc...right?

My feathers turned into chunky, funky vines, whatever. 

Well, apparently I sold myself short. The response from people seeing my home-quilted quilts has been overwhelming!  People liked it, and were shocked I was doing this on a domestic machine. The truth is, I still don't think I'm all that great at it, but I do love the free motion quilt.  I can't handle much more than a small throw quilt without difficulty, and I still haven't mastered the even stitches bit even with a stitch regulator, but I love it.  I think it is my favorite part of the process!

No, my quilt isn't swearing, they're just asterisk snowflakes. 

But what I keep hearing from people looking at the few quilts I have up that I've quilted myself, is that they wouldn't have any idea on how to fill the space, and they wouldn't be brave enough to freehand the design. Well, yes, I'm not using a stencil or a computerized design, so technically, I am free handing the designs, but I'm most definitely not brave enough to completely freehand just yet! BUT...I do have a few cheats to share for those of us just starting out in free motion and for us not feeling confident enough just yet to 100% freehand.  Here we go! 

Free Motion Quilting Cheats

1. Pinterest really is a wonderful, wonderful thing.  If you're feeling stuck, pop on there and you can find a world of free motion designs to inspire you.  I have spent countless hours looking up designs because my arsenal is limited. Just search "free motion quilting" and you'll find yourself sucked right in. 

Exhibit A, found on Pinterest. 

2. Let your fabric and pattern work for you. Does your fabric have an interesting design, or does your pattern have its own funky natural lines?  Follow the leader and stitch around those patterns.  

3. I'll be honest...the Press and Seal trick did not work for me at all, not even one measly bit. It didn't slide underneath my quilting foot very well, and got bunched up even when I eased up the pressure on the foot. Also, when I tried to move the fabric around the design, the wrap didn't stay put and it moved with my hands. Oh, and that stuff is a pain int he ass to get out of your stitching...I ended up doing more damage to my stitches than I did to the Press and Seal, even trying to be delicate with tweezers! 

Please accept a picture of some Scottie puppies as a completely adorable substitute. 

4. If you can audition patterns, that is really, really helpful.  That's probably, in my opinion, what the Press and Seal is best for.  But, it is translucent and you don't get a good feel for how the pattern looks on your quilt.  My solution was overhead projector sheets.  Yeah, yeah, I know, how has those anymore? I've had these babies laying around since my junior year of high school...and only just found a good use for them. 
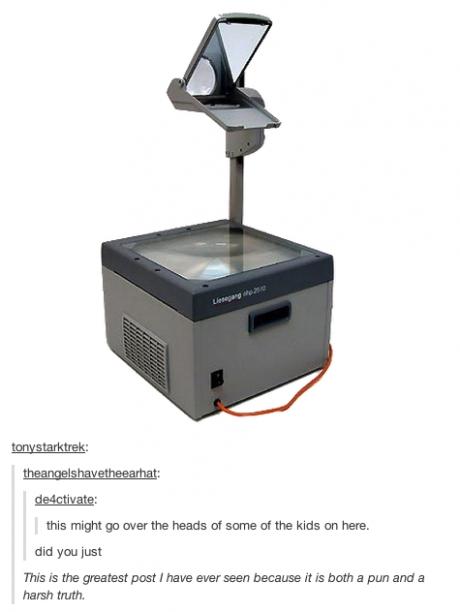
Sorry...I mean these....


But they're 100% clear and you can use Sharpie, a dry erase marker, or an overhead marker to trace out the design, or designs, you're toying around with. This will give you a much better idea of how your design will look on your quilt without ever having to take a stitch, and with zero marking on your quilt.


The pitfall is that you shouldn't really sew over these...they're quite stiff and getting the plastic out of your stitches would be at very best a nightmare. Once you get the idea of how it will look and what you want, it's time to be brave and dive in, or...

5. You can always you a washable fabric pencil, or water soluble marker to draw your design directly on the fabric. You can stitch right over it and wash it off when you're done...or, with all of that handling, it may wipe away on its own as you work.  This is best done in chunks because as you handle the quilt, especially if you opt to use a fabric pencil, it will wipe away...so it's best not to spend all your time drawing out the whole quilt only to have it fade away.

6. PRACTICE, PRACTICE, PRACTICE. Before you even sew a stitch on your quilt, make yourself a "test quilt" to make sure your tension is in order, and to make sure you know how to actually do the design you want.  When I make a "test quilt" all it is, is a 14" x 14" or so piece of scrap batting with scrap fabric on either side to act as the quilt top and back.  That way you are practicing on roughly the same materials as your quilt is made from.  Get you design down, your tension right and your courage up and you're ready to roll! 

Tuesday, September 6, 2011

Some Finished Projects, and Tippy Tuesday!

Well, it's been QUITE the weekend. I can honestly say I pushed myself to the point of being so physically and mentally tired I couldn't think of the word for guacamole (and I love guacamole). We changed the store up...just about the only things that didn't move are Color Wall and Clearance. It looks pretty dang good if I do say so myself, but it was a LOT of hard work. Mom is notorious for pushing herself too hard, and so considering a week off of her heart attack she was wanting to move things, I made sure I stayed late and came in early so I got the heavy lifting done before she got there so she wouldn't try to do it herself. Who'd have thought that there would be heavy lifting in a quilt store? Well, there is...those bolts are heavy if you move more than 2 at a time (which I did). But it wasn't all me thank goodness, we got my folks, my aunt, brother and my roomate to help get things done and after 3 days of moving I swear I couldn't have done it without their help! The busted their rear ends too and for that I thank 'em. So y'all will have to come in and see!

Besides doing the big fall floorset, I got a couple quilts done too. The first is a quilt from posts past. I finally got the borders on and it looks fabulous! It was really hard for me to do a random and scrappy style quilt, especially one that is really heavy on pattern, so I'm happy with the results. We were going to have kits for this, but when I discovered how the borders had to be cut to look right, it just wasn't going to happen. So, just about all of the fabric is still available, but no kits.


The whole kit 'n caboodle. Scrappy, yes?

A detail shot. I am in LOVE with that border print. It's a strong pastel, which, any pastel isn't really my thing, but this one is really cute. And it's a sewing theme too so it's gotta be good ;-) In case you're wondering, the beige in the print is actually a sewing pattern for clothes, the kind that comes printed on the it's-so-thin-you-look-at-it-sideways-and-it-tears tissue paper. It's a little hard to see in this picture.

A detail of the ceter of the quilt. And my feet.


 The other quilt is a quilt from a postcard pattern. They're $2 apiece and all of the quilts are simple and of various sizes, from wall hangings to very large throws (this one is I think about 74" square). I started this in January and obviously got very, very sidetracked. But it turned out nicely, and it's definitely in my favorite colorway.
Simple, but it's one of those quilts where color and value placement make a world of difference. This quilt could look completely different by turning the blocks different ways and placing the color differently.

A little more detail of the fabric, sans feet. I am also in LOVE with that border. this picture doesn't do it justice, the color is so vibrant.


So enough of my quilts, now on to this week's tips!:

* If a spool of thread you're using doesn't have a notch or anything to keep your thread from unwinding when it's not in use, cut a thin strip of Saran Wrap or Press & Seal wrap and rap it around your loose end. It prevents the thread from unspooling, it's easy to remove when you need the thread, and it doesn't damage the thread either.

* To keep scissors or thread clippers handy near your sewing machine without having to watch that they don't fall of the table while you're sewing/cutting, a suction cup hook from the Dollar Store attaches/removes easily from the side of your machine and keeps what you need easily accessible and out of the way.

* A Boning gun (the gun that attaches the plastic "bone" to both a garment and the price tag) comes in handy when you want to keep blocks or like scraps together for use later. The hole it creates is no larger than a T-Pin and your pieces won't come separated from each other until you decide to use them.

* If you're quilting a large quilt and find yourself struggling with the weight of the quilt forcing it to fall off your table while you're quilting, the following 2 tips help combat that weight: 1) if you're able to, put your sewing table in a corner while you quilt - that elimiates 2 sides from which your quilt can fall over and pull while you're sewing, and 2) if you can't put your table in a corner, take the loose end of your quilt and drape it over your shoulder and chest - it won't fall and your arms are still free to quilt the way you need to.

* For smaller quilts, use a spray adhesive on the back of your backing and of your quilt to baste it to your batting. it saves you time on pinning, doesn't come undone, and doesn't gunk up your needle or machine. Just be sure not to spray the adhesive on to your batting - it will simply absorb the adhesive and your fabric won't adhere.

* If you are quilting a quilt yourself and don't want to use a stipple and youdon't have access to a computerized longarm for designs, your local craft store has a large selection of stencils that can be used as quilting patterns. Use a chalk pouncer or a water soluable pen to trace your design, and stitch on your marks.

* If you don't have a hard floor, go to your office supply store and buy a hard mat that is for underneath a rolling chair, and put it under your sewing chair byu your machine. Threads and scraps fall to the floor all the time, and this hard surface is a snap to clean - just sweep your threads/scraps up and you're good as new. A magnet will help pick those pins that fall on there quickly and poke-free too!

* Most stores when you're buying clothes will either give you the hanger, or ask you if you want to keep it; if it's a clip style pnats hanger, say yes please! Those clip hangers are great for storing finished, unquilted quilt tops up and away from anything that could damage themor cause your fabric to ravel. They are also great for storing odd pieces of batting, quilting stencils, large pattern pieces, large pieces of template plastic or odd sized cutting mats.

* To keep your cutting accurate, use the right ruler for the job and measure using your ruler, NOT your mat. Over time and wear, mats can groove and warp, making your cuts less accurate as time goes on. The hard acrylic rulers are made from does not warp with time and your cuts will always be accurate. It also enables you move where you cut, which causes less wear on your mat over time. This method works for cuts as larger as youer needed ruler allows, from strips of varying width up to 25" square.

* The rubber stops on knitting needles are great to use on your small sharp scissors. They prevent your points from getting dull from storage (other items may hit your scissors) and it protects both you and your projects from accidentally getting poked or cut.


Sunday, March 13, 2011

First some bragging then some blogging!

Okay. First the bragging. My friend Isabelle (one of my besties, in fact) has just started quilting. I helped her through her first one, but I made her do her second one on her own :D I knew she had the skills, it was just a matter of getting the supplies and doing it!
This is her second quilt. She did a fabulous job!!! She texted me the picture right after she finished. She was so excited, and I was excited for her!

My God. I've created a quilting monster! It's alive, it's aliiiiiiiiiive, IT'S ALIII- *cough* Congratulations to Isabelle on her newfound quilting addiction :D


Now onto the blogging. So apparently I've become the free motion, embellishment girl at the shop. I'm totally okay with that! I love the freedom that free motion gives me to let projects just evolve...and really, the embellishment is the icing on the cake!

One of my favorite embellishment items is Angelina Fiber. This stuff is COOL. It is a synthetic fiber that bonds only to itself, so it lends itself to ann kinds of neat techniques. All you need is some plain paper, some Angelina, and an iron set to your silk/wool setting.
Angelina comes in packs like so. The fibers themselves can either be straight (like above) or crimped. I prefer the crimped style, because I like the texture it has.

So what am I getting at? Last week I walk into work and there's a big ol/bag of Angelina waiting for me and at the bottom of the bag, a pattern for an Angelina covered fabric bowl. Yes, yes...I flipped out. It was cool! So I grabbed some Timtex and a few fat quarters and got to work. Do I have any photos of that process? Nope! I didn't think that far. Honestly, this was a free motion project that just kind of fell together. I didn't know how it was going to go until it hapened, and I'm pretty happy with the results.

So there's the bowl. It's a lot pinker than what the picture shows. iPhone camera + fluorescent lights...you know the drill. Anyway. Those little bags are snack packs of Angelina fibers. The cool thing about Angelina is that you can mix colors! I mixed the two above with a purple shot gold. I fused them together to make the center of the flower. Once you fuse your Angelina together, you sew the fused piece whever you want it to be on your fabric. Easy peasy, lemon squeezy!

So here are some more pictures that show the detail of the Angelina and the quilting:


I used a regular Gutermann cotton thread, and a cotton Sulky Blendables variegated thread in the stippling. I like the angelina to still have loose fibers, so I just really lightly stitched it down. Does that make the bowl functional? Nope. But it sure turned out neat!

When I brought it into the shop, I was informed that "Oh, good! You can teach a class then." lol. Okay then! So if you're interested in maing an arty little bowl and learning to use Angelina, keep your eyes open at the shop for details!

Today when we went to E.E. Schenk's, I scored some Decolourant. What is that? Basically, it's a fabric dye that removed the base color of the fabric when it is applied, leaving only the color of the dye. This means you cna make your own custom pieces of fabric...you can dye prints on black fabric witout compromising the effect of color on the black fabric! If that doesn't do the trick, think of it like a hair dye that both bleaches and dyes your hair at the same time. Cool, huh? I'll be posting about that soon, once I figure out the technique...and I promise I'll take better pictures of the process!

Well, as usual I'm blogging into the late hours of the night, and after losing an hour of sleep (oh the pitfalls of "springing forward"...yuck.) I'm absolutely bushwhacked.

Have a good night everyone, and happy quilting!