Showing posts with label The Cotton Patch. Show all posts

Tuesday, August 27, 2013

It's Beginning to Look a Lot Like Halloween...

It's August and if you know me you know this is the beginning of my favorite time of year...Halloween merch is beginning to hit the stores and I am one happy camper. 

That, and it's time to get samples done for the shop for fall and Halloween.

We got a few super cute panels in, and I've finally finished the quilting on both.  One is a 13 Days of Halloween "Advent" calendar, and the other is just a cute panel....it'll be obvious as to which is which...or should I say, witch is witch!  Haha! 

This one is the Thirteen Days of Halloween...not sure what the line is called offhand.  But I did my own quilting and embellishing here, and in the second picture you can see Mom creeping around and  photobombing my picture of the display. 


And this one...I call this one "Oogie Boogie" because the pumpkins and the writing reminded me of Oogie from Nightmare Before Christmas...no idea why!  But I added ghosts made from Angelina Fiber (very fun stuff to use) and did my own quilting here too. 


Monday, May 20, 2013

What. A. Weekend.

Whelp, it's official.  I am an official chunky monkey and slightly old.  After 4 days wandering International Quilt Market in Portland this weekend, my glutes are not only full of an unreasonable amount of lactic acid (who thought quilts could make you "feel the burn?"), but I am totally whupped mentally and physically. So many clever and useful things learned and so many amazing and beautiful things seen (and bought!).

That is NOT by any means a complaint.  It was SO worth it, and I cannot wait to do it again in October in Houston! Time to start saving those pennies for the plane ticket!

I know I promised a big fatty fat blog full of what we saw, what we did and what we learned but after uploading close to 500 or so pictures...which, by the way, is not an exaggeration by any means, if anything I'm underestimating...it would be the longest entry of all time and you'd get bored as all get out about a third of the way through.  So, I am going to post in little chunklets:

- First, you'll see what Schoolhouse is like, and a little run down of the neat things we saw and learned.
- Then, you'll see the show at large and of the booths that the vendors very kindly allowed us to photograph (always ask first!)..and who we were lucky to meet!
- Finally, you'll get a glimpse of a selection of the gorgeous quilts on display...and yes, they DID allow pictures of quilts to be taken on the grounds that credit was given to the creator and it is stated that the quilts were displayed at Market.

Most of the pictures are posted on The Cotton Patch's Facebook page ("Like" us if you haven't already, and   take a cruise through the pictures there), but I will be posting here as well, with all credit given where credit is due! And just a forewarning...I might be the LEAST photogenic person on the planet so most pictures with me in it, so there are lots of awkward, unflattering and bizarre facial expressions...I'm not that ridiculous looking in person, so why ti has to be that way on film, I don't know.

But anyway, I feel very lucky to have been able to go and be a part of Market, if even just as a customer and fangirl. I can't wait to see what Fall Market in Houston has in store!

Wednesday, May 15, 2013

International Quilt Market...in PORTLAND!!!

I love my job working in a quilt shop, and it's awesome just about always, but sometimes...it is absurdly cool.

I'm going to the Spring International Quilt Market in Portland tomorrow through Sunday. 

I'm only a little excited. 

I went to Market in Houston  a year and a half ago, and it was amazing:

This isn't even a quarter of what was there. 

That was Fall Market, which is always in Houston...great for easy access to Waffle House hash browns (don't EVEN get me started!) but not so great on travel convenience.  But luckily for us in the Northwest, Spring Market moves around and this year it is in Portland.  I'll miss the hash browns, but it's going to be great being so close! 

Once Market is all over with, I'll have a nice long post of pictures, news and cool stuff on here, but if you want live posts of what's happening, go "Like" The Cotton Patch's Facebook and see what we're seeing! 

Monday, April 29, 2013

Mid Valley Quilt Guild: Fire and Ice Pictures

So the MVQG show is over for this year, and won't take place again until 2015.  Want a little snapshot of what you missed?  I've got some pictures to post here...if you want to see some more up close and personal pictures of the quilts, go to the shop's Facebook, The Cotton Patch


Thursday, April 25, 2013

It's Quilt Show Time! Fire and Ice: Pieceable Passions

Well, Quilt Show season has officially begun!  It's time a for a few shameless plugs!

The Mid Valley Quilt Guild, native to Salem, is putting on their biennial quilt show in Rickreall beginning today through Saturday.  This year, the theme is Fire and Ice: Pieceable Passions.  Many very talented local quilters will have their beautiful quilts on display and there will be lots of vendors to check out as well.

By the way... The Cotton Patch has a booth there!  I will be in the booth this afternoon, tomorrow afternoon and all day Saturday to hold down the fort.  If you have some time to come and see the gorgeous quilts on display, please drop by our booth to say hello!

Fire and Ice: Pieceable Passions is located at the Polk County Fairgrounds (520 Pacific Hwy) in Rickreall, Oregon. Admission is only $5 and parking is free!

Hours are:
Thursday, April 25: 9am - 5pm
Friday, April 26: 9am - 8pm
Saturday, April 27: 9am - 4pm

Wednesday, November 9, 2011

Two Finished Projects in Two Days. Bam!

Whelp, I have spent the last two nights sewing my booty off and here's what I came up with:

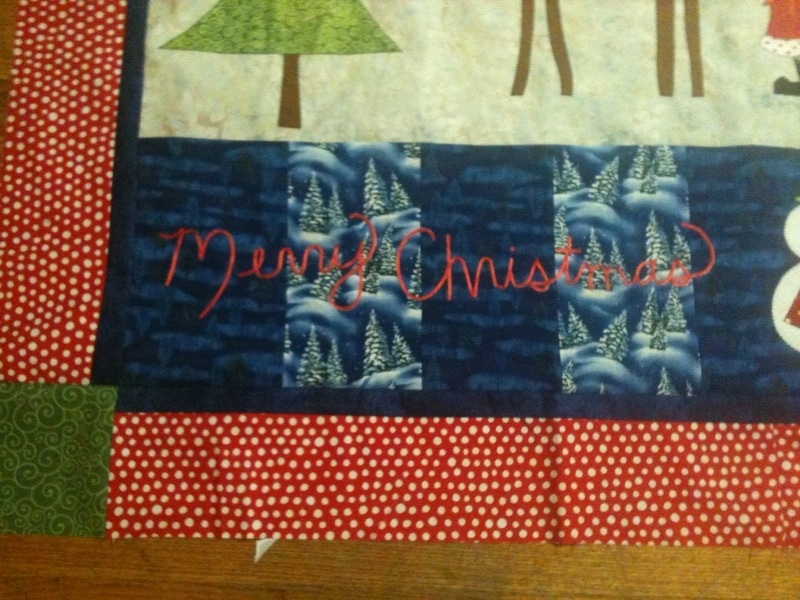
Woo! It's done! The one complaint I have about Piece O'Cake's pattern is that there really wasn't a helpful placement guide and so just in eyeballing how far away to put the reindeer and Santa from the seam I ended up placing them too low when I gauged how far down to put the large tree. There ended up being a huge white space and it looked weird I thought, so I just filled in with more trees. I like the end result there! and the green squares in the corners aren't part of the pattern either, I just thought it would be an easy way to bring the green out without it being overpowering.


It also called for thin ric-rac for the lettering, but gave no placement guide for the letters, so I just used Hot Fix ribbon and my own sloppy cursive. It's whimsical, dammit! :D


Here is another one from BJ Designs, another of my favorites. It's just a quick and cute 20" by 20" mat.

Here's the whole kit 'n caboodle. It's hard to see here, but the "white" is actually a light gold with gold metallic snowflakes on it. It's not as bright and glaring in person as it is in the photo. Thanks, fluorescent lighting!

Here's a closer shot. See? The "white" is actually gold. Not quite as intense. But the snowflake is Michael Miller's Fairy Frost with the the glitter. Oooh....sparkly.


Let's see. Next up I have another mat like the snowflake (but it's a candy cane instead) and yet another from BJ Designs that's a large wonky Christmas tree. I'll get a picture posted of that soon, once I get it all together :-)

Tuesday, November 8, 2011

Bad Blogger...Bad!

Well, since we got back from Quilt Market, I know I haven't been the most diligent blogger around. Truth be told, I've been busy as all get out! I've been getting projects done (like you saw in the last 2 posts) and I've been working on the new ideas for the shop that we learned at Quilt Market. Plus, for the month of November we're short staffed at the shop so Mom and I are pulling double and triple duty to make sure things go smoothly. That being said, get better soon Debi! We need you :-)

So in the mean time, I'm running out of informational topics to write for you about. If you want to see something quilting related discussed on this blog, leave a comment and I'll make it happen! Untill then...I'll have a slew of neat new tips for you tomorrow.

Sunday, November 6, 2011

It's not even Thanksgiving yet!

I know. I know. Those of you that know me know how I feel about Christmas invading my life before I'm good and ready - which invariably is the day AFTER Thanksgiving. Buuuuuut I work in a quilt shop and now October was the time for beginning our Christmas samples. So after getting a simple little poinsettia tablerunner done...this is ny next one. It's from the Piece o' Cake book

Tuesday, November 1, 2011

Are you on Facebook?

Are you on Facebook? Are you friends with The Cotton Patch? Well, our profile got locked and due to the nature of the security questions to get back in, we are unable to access it to update. When you're friends with so many people from all over, people that you may or may not know personally, how is one supposed to identify that person in any random picture on that person's profile? Unrealistic? Yes. Needless to say, we won't be getting back in to our account.

So. Out with the old, and in with the new! If you're on Facebook, CLICK HERE to "Like" our page on Facebook, or search "The Cotton Patch" and find the page that way. Look for updates on new fabrics, classes, and general quilting world news.

Tuesday, October 4, 2011

Shop Hop: Sew Oregon 2011


Sew Oregon is just about here! We (The Cotton Patch) along with 49 other wonderful Oregon quilt stores, will be participating in this shop hop. Click on the Sew Oregon link to view more details on the official website but for those unfamiliar with shop hops and Sew Oregon, I'll give a little explanation.

A shop hop is an extended event held by regional quilt stores, usually lasting 2-3 weeks, where free quilt blocks are offered using 1 or more common fabrics between shops.  Customers can travel shop to shop to get a free block at each one, and to shop in their store As you accumulate these free blocks, depending on how many shops you choose to visit, you will be able to make a quilt commemorating your trip. The free blocks give you incentive to get out to store you otherwise don't visit often, and it's a great way to get out of twon with friends.


SewOregon
Sew Oregon is the largest shop hop in Oregon, this year with 50 stores participating, and we are one of them! You will need to get your Sew Oregon Passport (CLICK HERE to get your passport) stamped in each store to show you've been there, and if you visit all of the stores in a district, you will be able to fill out a drawing ticket, which will make you eligible for the Grand Prize drawing - this year, the grand prize is a Alaskan Quilting Cruise for 2 good for the August 2012 trip. How cool is that? Last year, one of our regular customers won the Grand Prize...this year it could be you! Turn in your passport at the last store you visit and they will take care of your drawing tickets for you.

Now for the boring rules and regulations. Every store has their own rules as far as passports go. The Cotton Patch's rules are as follows:
- One Passport stamp per customer.
- You must be present to recieve stamps, either in-store or visibly waiting in the car. We will not stamp Passports for friends who are not present. Even if a store you've already visited stamped multiple Passports for you, we are not required to do the same.
- We always ask if your companions with Passports are quilters as well. We do not give stamps to children or to tag-a-long husbands who are along for the ride but don't quilt - stamps go to quilters only and we allow only one Passport per quilter. Even if a previous store stamped their Passports, again, we are not required to do so as well.
- We don't discriminate; we will give stamps to young and male quilters, but as stated before, we will ask.


Every year Sew Oregon is an absolute blast. I'll be going around to a few shops, on what will be my very first shop hop, with my friend Isabelle. It's going to be a lot of fun! I know us gals at the shop can't wait to see all of our regulars and the new faces that Sew Oregon brings, and I'm excited to see (and buy) the wonderful things our local quilt shops have to offer!

See you on the hop!

Wednesday, September 28, 2011

Cabins in the Stars

Here is one of those current projects I mentioned a couple posts ago. This one is called Cabins in the Stars by Rita Fishel in her book Everyday Quilts. I loved it, and it's outside of the box for me. You know how I feel about piecing...I usually stick with applique when I can help it. But this one, basic though it is, really called to me and I had just the fabrics in mind. Consider of course the fluorescent lighting in my house and the camera phone, but the colors are much more intense than shown. The pink really glows next to the purple and copper metallic.

Rita Fishel's book. It's a really good one, lots of beautiful, versatile patterns.


This is the pattern I'm doing. I know it's hard to see but it's basically Log Cabin blocks and Variable Stars. It goes to show how color placement and block arrangement can make a simple pattern spectacular!

This is that pink/purple (both batiks) combination in the log cabin. Where you see the orchid purple in the pink is actually a really electric pink in an otherwise magenta and rust batik. It really is a stunning piece in person, and I fell in love with it as soon as I saw that shock of glowing pink in there.

Again, it's hard to tell but the center fabric (a batik) isn't that dull. It has the purple, magenta and copper in there so it really pulls everything together. The background is a deep chocolate brown (not a batik) and that copper (Also not a batik, it's Fairy Frost in "Coin" by Michael Miller) really makes the log cabin and center fabric just pop.

As you can see, I did mix batiks and regular quilting cottons together in this quilt. Usually I opt for one or the other, but in this case the subtle prints in the browns and the Fairy frost really offset the batiks well. As far as sewability, they sew together just fine! I have to say, I LOVE the way batiks sew. They press nice and flat, they don't ravel as much...Beauteous.

Since I'm on Mom-mandated day off from work today, I'm going to try and get this done. Oh, and I'm teaching my roomate how to sew too! I'm excited for her to start :D Mo' quilting buddies, mo' betta'!

Friday, September 16, 2011

Fall Tablerunner

My fall allergies dang near have me down for the count, but at least this fall tablerunner won't make me sneeze...unlike the changing season...


This little beauty goes off to the quilter tomorrow and then up as a sample at the shop. Now it's time for a heavy dose of Nightime Benadryl and a good long sleep.

Tuesday, September 6, 2011

Some Finished Projects, and Tippy Tuesday!

Well, it's been QUITE the weekend. I can honestly say I pushed myself to the point of being so physically and mentally tired I couldn't think of the word for guacamole (and I love guacamole). We changed the store up...just about the only things that didn't move are Color Wall and Clearance. It looks pretty dang good if I do say so myself, but it was a LOT of hard work. Mom is notorious for pushing herself too hard, and so considering a week off of her heart attack she was wanting to move things, I made sure I stayed late and came in early so I got the heavy lifting done before she got there so she wouldn't try to do it herself. Who'd have thought that there would be heavy lifting in a quilt store? Well, there is...those bolts are heavy if you move more than 2 at a time (which I did). But it wasn't all me thank goodness, we got my folks, my aunt, brother and my roomate to help get things done and after 3 days of moving I swear I couldn't have done it without their help! The busted their rear ends too and for that I thank 'em. So y'all will have to come in and see!

Besides doing the big fall floorset, I got a couple quilts done too. The first is a quilt from posts past. I finally got the borders on and it looks fabulous! It was really hard for me to do a random and scrappy style quilt, especially one that is really heavy on pattern, so I'm happy with the results. We were going to have kits for this, but when I discovered how the borders had to be cut to look right, it just wasn't going to happen. So, just about all of the fabric is still available, but no kits.


The whole kit 'n caboodle. Scrappy, yes?

A detail shot. I am in LOVE with that border print. It's a strong pastel, which, any pastel isn't really my thing, but this one is really cute. And it's a sewing theme too so it's gotta be good ;-) In case you're wondering, the beige in the print is actually a sewing pattern for clothes, the kind that comes printed on the it's-so-thin-you-look-at-it-sideways-and-it-tears tissue paper. It's a little hard to see in this picture.

A detail of the ceter of the quilt. And my feet.


 The other quilt is a quilt from a postcard pattern. They're $2 apiece and all of the quilts are simple and of various sizes, from wall hangings to very large throws (this one is I think about 74" square). I started this in January and obviously got very, very sidetracked. But it turned out nicely, and it's definitely in my favorite colorway.
Simple, but it's one of those quilts where color and value placement make a world of difference. This quilt could look completely different by turning the blocks different ways and placing the color differently.

A little more detail of the fabric, sans feet. I am also in LOVE with that border. this picture doesn't do it justice, the color is so vibrant.


So enough of my quilts, now on to this week's tips!:

* If a spool of thread you're using doesn't have a notch or anything to keep your thread from unwinding when it's not in use, cut a thin strip of Saran Wrap or Press & Seal wrap and rap it around your loose end. It prevents the thread from unspooling, it's easy to remove when you need the thread, and it doesn't damage the thread either.

* To keep scissors or thread clippers handy near your sewing machine without having to watch that they don't fall of the table while you're sewing/cutting, a suction cup hook from the Dollar Store attaches/removes easily from the side of your machine and keeps what you need easily accessible and out of the way.

* A Boning gun (the gun that attaches the plastic "bone" to both a garment and the price tag) comes in handy when you want to keep blocks or like scraps together for use later. The hole it creates is no larger than a T-Pin and your pieces won't come separated from each other until you decide to use them.

* If you're quilting a large quilt and find yourself struggling with the weight of the quilt forcing it to fall off your table while you're quilting, the following 2 tips help combat that weight: 1) if you're able to, put your sewing table in a corner while you quilt - that elimiates 2 sides from which your quilt can fall over and pull while you're sewing, and 2) if you can't put your table in a corner, take the loose end of your quilt and drape it over your shoulder and chest - it won't fall and your arms are still free to quilt the way you need to.

* For smaller quilts, use a spray adhesive on the back of your backing and of your quilt to baste it to your batting. it saves you time on pinning, doesn't come undone, and doesn't gunk up your needle or machine. Just be sure not to spray the adhesive on to your batting - it will simply absorb the adhesive and your fabric won't adhere.

* If you are quilting a quilt yourself and don't want to use a stipple and youdon't have access to a computerized longarm for designs, your local craft store has a large selection of stencils that can be used as quilting patterns. Use a chalk pouncer or a water soluable pen to trace your design, and stitch on your marks.

* If you don't have a hard floor, go to your office supply store and buy a hard mat that is for underneath a rolling chair, and put it under your sewing chair byu your machine. Threads and scraps fall to the floor all the time, and this hard surface is a snap to clean - just sweep your threads/scraps up and you're good as new. A magnet will help pick those pins that fall on there quickly and poke-free too!

* Most stores when you're buying clothes will either give you the hanger, or ask you if you want to keep it; if it's a clip style pnats hanger, say yes please! Those clip hangers are great for storing finished, unquilted quilt tops up and away from anything that could damage themor cause your fabric to ravel. They are also great for storing odd pieces of batting, quilting stencils, large pattern pieces, large pieces of template plastic or odd sized cutting mats.

* To keep your cutting accurate, use the right ruler for the job and measure using your ruler, NOT your mat. Over time and wear, mats can groove and warp, making your cuts less accurate as time goes on. The hard acrylic rulers are made from does not warp with time and your cuts will always be accurate. It also enables you move where you cut, which causes less wear on your mat over time. This method works for cuts as larger as youer needed ruler allows, from strips of varying width up to 25" square.

* The rubber stops on knitting needles are great to use on your small sharp scissors. They prevent your points from getting dull from storage (other items may hit your scissors) and it protects both you and your projects from accidentally getting poked or cut.



Thursday, September 1, 2011

A Quarter Century, Minus 1.

Before I get on with "Thursday: It's Technical," I want to say THANK YOU to everyone for all the birthday wishes!  I love you all! <3 It's going to be a good day.

Also, I'll have pictures up soon, but Frances brought me my Ghastlies quilt back yesterday, and it looks fabulous! She always does such a great job. Varigated thread always looks great.

Wednesday, August 31, 2011

VICTORY IS MINE!

Happiness is finishing a project you didn't think you had the skill to do, and not only that, but doing it well.
I'm really, really happy with how this tunred out, and I don't have any [major] oopses. The hand embroidery is a little shaky, but that too will get better with practice and maybe a little stabilizer too.

Sunday, August 21, 2011

'Tis the Season to be Spooky, Part Tres

ALMOST DONE. All that's left to do is the little bits of embroidery, then put on the borders. I'm debating whether I want to do the scrappy pinstripe border or not, and I'm thinking this needs a tone-on-tone black border rather than just a plain solid...nothing too flashy but just enough to give it a little interest.

Here's what's together so far!


My favorite one! What can I say, that glittery fabric is awesome. 


Here's the whole kit'n'caboodle. I'm really happy with how it turned out! I'll get the embroidery done in the next couple days and get those borders on, then it'll be off to Loretta to get it quilted! She's got all kinds of really really cool halloween patterns. I'm thinking jack-o-lanterns and candy corns!