Well, I met Tula Pink and Anna Maria Horner, and Kaffe Fassett kicked my shin. Lol. No, seriously! He was walking through my aisle and I couldn't pull my legs in any further and he got me. Yay for strange stories!
Otherwise, we did the Schoolhouse Series yesterday and we're doing the exhibits and shopping today. Woohoo!

Saturday, October 29, 2011
Thursday, October 27, 2011
International Quilt Market 2011 - Houston or Bust!
Well my dear readers, I'm going to be signing off here for a few days because I'm going out of state and away from my little netbook. International Quilt Market here we come! Yes, I'll be in Houston for the Internation Quilt Market 2011 with Mom, taking classes, looking at fabric and ninja-ing my way through Sample Spree.
I'll be back on here by Tuesday! Until then, do try and behave a little on Halloween...eat, drink and be scary...and have a designated driver!
I'll be back on here by Tuesday! Until then, do try and behave a little on Halloween...eat, drink and be scary...and have a designated driver!
Wednesday, October 26, 2011
Top 5 Favorite Pattern Designers (in no particular order)
1. BJ Designs
BJ Designs is my all time favorite pattern company. She meshes realism with whimsy, and it's predominantly applique which is my favorite quilting method. Her animals are so neat - I've done the Kangaroo, Bear and the Elephant. There are more than just animals, she offers holiday and miscellaneous patterns too. The neat thing about BJ is that she is interested to see your version of her pattern. A customer of ours had commented to her that someone at our shop had done 2 of her quilts as samples and she was very interested in seeing how it went! I sent her the photos and got a response back from her too, which I thought was really nice!
2. Bigfork Bay
Bigfork Bay walks the line between whimiscal and realistic, and I love them both. Their pieced quilts are fantastic, but I much prefer thier realistic animal patterns. Big surprise, huh? The realistic ones are a challenge, but the outcome is SO worth it. So far I've conquered the lion and the wolf, but I'd love to work on the puffins and the tiger too. They have lots of horse patterns as well, and lots of deer too. They give their animals such neat names too, that you hardly feel inclinded to name your own quilt. Check out the rest of their patterns here. Plus, they also sell kits to their patterns so if you like what you see, you can make it as close as possible!
3. MountainPeek Creations
MountainPeek is one of my go-to pattern companies for when I want something to make that focuses more on showcasing incredible fabrics and that goes reasonably quickly. They are fantastic! Though many of the patterns are pretty simple, they are very impactful based on what gets used to make them. They do Fat Quarter and Pre-Cut focused patterns too, so they really cater to all. I love their Shadowbox pattern, and it is perfect for those last little bits of focus prints you have laying around. I'd link to everything, but the way their website is set up, t's not condusive to linking. So click the MountainPeek link above and have a look!
4. Quilt Woman
Out Blank Rep turned me on to this pattern company and boy do they have it all - quilt patterns, bag patterns, clothing patterns, even beginner specific patterns! Plus they also go a lot for the AccuQuilt system, so if you have one of those bad boys, Quilt Woman has patterns designed specially for that piece of wonderful equipment. Here there really is something for every quilter and stitcher alike. One of my very Favorite patterns is "Flying for Nitwits" which is, you guessed it, a Halloween quilt!
5. Briarwood Cottage
The Booville quilt made me a believer! Once I saw (and made, pictures will be up soon) that quilt, I started looking into the rest of their stuff and it is great! They have Block of the Month quilts as well as wallhangings and the like, but I really am partial to their Block of the Month style stuff. The sizes are manageable and they are really versatile for all styles of fabric.
Tuesday, October 25, 2011
Pumpkin Patch and Yard Decor

First we set off to find pumpkins and we found this awesome place in Gervais called Another Pumpkin Patch (left; go to their Facebook HERE) and they are absolutely the best! They donate 100% to Famers Ending Hunger and Marion Polk Food Share.

We walked away with 10 small gourds, 1 large gourd, 4 white pumpkins, 4 large orange pumpkins, a red pumpkin and 2 grey pumpkins for $35. This is only a little over half of what we got. A big THANK YOU to Molly at Another Pumpkin Patch for doing what she does!

As you saw above, the weather was kind of, well, Oregon-esque. Cool, grey and damp. But a few hours later it cleared up and I have to say, few things out in the world are prettier than a bright, crisp blue fall sky and the bright orange, red and green leaves.

So my roomate had bought some hologrpahic ornaments to put in the tree. They're little gravestones...cool idea!

Some decorating had been done all ready, like these spiderwebs and giant spiders...I learned later that our across the street neightbor is terrified of spiders. Whoops. Well, I guess you can't win 'em all.

Skeleton brides and grooms, gravestones...I'm contemplating putting some fabric/balloon ghosts out there. I think we have something like 10 gravestones total out there.

The white pumpkins we thought would look nicer painted than carved. So I got bored the other night whatching re-runs and decided to paint a damask bat on one. The damask didn't work out as well as I hoped so I opted for lacy instead. I'm pretty happy with the results!

Another shot of the white pumpkin. I thought a painted stem and spiderwebs would look neat. My roomate suggested using it as a centerpiece on our snack table. I do have a pumpkin stand, so I think she's right!
Well, that's it for now. I'll post more pictures after we get back from Houston. Everyone's costumes are coming right along and the inside of the house is looking nice and spooky. Our neighbors and passers by were giving my roomate and I weird looks because we were out in the driveway destorying a set of old curtains...we burned holes in them, ripped them, dragged them through the dirt and gravel, and sprayed with with fake blood. Our house is going to be a haunted house! Woo! Boy, I love Halloween time :-)
Lovely Frankenstein's 31 Days of Halloween: Halloween Light Show
So this is pretty much the coolest thing ever. Some awesome person has orchestrated a light show to the tune of "This is Halloween" from Nightmare Before Christmas. Love it!!
Friday, October 21, 2011
Lovely Frankenstein's 31 Days of Halloween: Free Printable Party Set from Secondsister Suaviloquy
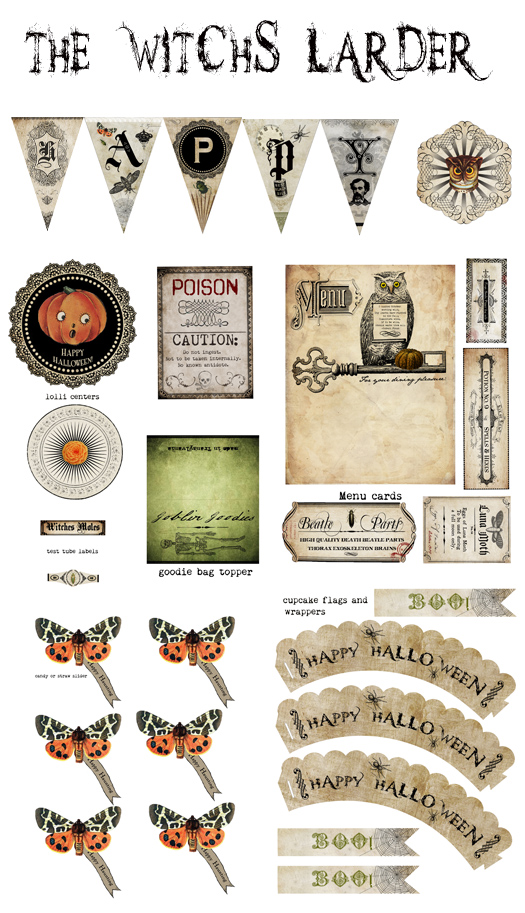
April at Secondsister Suaviloquy has developed and is now sharing a really cool printable party set called 'The Witch's Larder" complete with cupcake cup covers, pendants, little flags, invitations, bottle labels, tags and more.

Check out the set HERE and download the free printables. Thanks for sharing April!
How cool!
Check out the set HERE and download the free printables. Thanks for sharing April!
Thursday, October 20, 2011
Lovely Frankenstein's 31 Days of Halloween: Pumpkin Carving crafts!
CLICK HERE for some sweet pumpkin carving ideas...and other pumpkin motif crafts.
Thursday, it's Technical: Troubleshooting your Misbehaving Sewing Machine
More often than I'm willing to admit, I find myself being too hard on my little machine, cussing at it whenever it doesn't do what I want. Let's face it, to a certain degree, every quilter has had that moment of rage when their machine is messing up and they can't figure out why! Lots of times people are very quick to just take it in to be fixed instead of doing a little troubleshooting on their own, which may fix the problem. It's intimidating, especially if you're unfamiliar with your machine, to open it up and figure out what's up. Even those manuals can be a bit vague when you're frustrated and trying to figure out the random "who-the-heck-knows" fit your machine has decided to throw.
General Trouble Shooting
Here are few general steps to go through before doing anything more intricate or taking your machine to a pro.
Rethread. Yes, sometimes it's as simple as rethreading your machine and that's it. Your thread may have slipped out of the tension disks, broke, got caught somewhere or something like that, that you wouldn't necessarily see right away. Rethread your top thread and your bobbin thread. Speaking of bobbins...
Rewind Your Bobbin. Sometimes, if a bobbin isn't wound properly, it causes weird little issues. Be sure to wind your bobbin as per your machine manual's instructions; some wind clockwise, and some counterclockwise, so be sure to be attentive to that. Also, use one continuous piece of thread to wind your bobbin, not several pieces of varying color and length. It seems like a great way to save and use "waste" thread, but in therms of your machine's function, it causes more problems than it solves. Use one piece wound off of one thread spool. And while you're down in the bobbin area...
Clean Your Bobbin Case Area. Your machine probably came with a little, stiff bristled brush for this, but I have found that canned air (yes, canned air like for keyboards) works the best. If you don't have canned air, try a soft paintbrush or makeup brush - their bristles are soft and flexible and get in the crannies better than the stiff plastic bristles of the standard issue machine brush. Dust and lint can really foul things up if a lot has accumulated, and every now and then a wayward thread gets caught in the bobbin case. Brush or blow out that bobbin case area. Carefully remove the throat plate if needed (you know, the metal piece surrounding the feed dogs) with the screwdriver included with yur machine, and clean down around the feed dogs too.
Change Your Needle. It could be that your needle is bent, dull or barbed and snagging on your fabric or thread. It's amazing how much a little needle can mess so much up! Or, you may not be using the right needle for the job; CLICK HERE to learn about the types of machine needles and which works best for the task at hand.
Problem Specific Troubleshooting
Here are a few common problems and how they can be fixed (in most cases)
Help! My bobbin won't go back in! It sounds silly, but is your needle down, or up? If it is down, no amount of trying to shove that thing in there is going to get it in because the needle is blocking where the bobbin goes. Using the handwheel, gently raise your needle and then try again. If that doesn't work, have a look inside. If you have just cleaned your machine, odds are something didn't get put back in properly. Look for loose pieces and put them in again. Your bobbin case should go in just fine.
Help! My bobbin thread is coming through my top thread! It's a tension issue (ha, I know, you can say that again). Your needle tension is too high, high enough that it is pulloing the bobbin thread too hard and that's why it's peeking up through your top thread. Take that puppy down a noth, I mean, half a number at once. If your tension is at 3 when this occurs, drop it to 2.5 and try again.
Help! My top thread is poking through my bobbin thread! Another tension issue (hiii-yo!). Your needle tension is too loose. Tighten it by half a measure. If your tension is at 3 when this occurs, to up to 3.5 and see what happens.
Help! My fabric is puckering when I straight stitch, and I don't want it to! Yep, another tension issue. Look, tension's a bitch, it just is and it get knocked off pretty easy. In this case, both needle and bobbin tensions are too tight. Loosen your needle tension by .5 a measure. Get to your bobbin and take out the bobbin case. See that screw on the side? It needs to be loosened, but only a little! A little goes a long way with that thing, so try only a quarter turn at a time. Put your bobbin back in and try again. Adjust as needed until it works.
Help! There is smoke coming out of my machine, what did I do?! Well my dear, you might have just burned out your motor. There is nothing you can do to fix this on your own - take it to a pro. They might be able to fix it, but like damage to car consider whether the cost of the repair is greater than the worth of the machine. That might have been that machine's death throes and it might be time for a new one.
Help! My machine is skipping stitches! Unless you haven't had your machine cleaned in ages, this is a needle problem. Use the right needle for the job and change to a new one. It might be bent or barbed.
Help! My bobbin thread is a tangled, loopy nightmare when I sew! First, rethread your bobbin and top thread with the presser foot UP. If it's down, you're in tension mode and that can make the thread sit funny. try sewing again. If that doesn't work, change your needle. If that doesn't work, test with a different bobbin. It could be that your bobbin isn't wound well. If it's not, rewind another bobbin and get to work!
Help! My top thread keeps breaking! Make sure you are using a quality thread. Lower quality threads break much easier. If you're using a metallic, change to a metallic needle and take it slower - metallic threads break much easier than cottons or polyesters. To learn more about thread types and when to use them, CLICK HERE. More than likely it's a needle issue or a threading issue. rethread your machine first and try again. Usually that fixes the problem. If not, change your needle.
Machine Problem Prevention
- Keep your machine clean; get the dust and lint out of there after every project, or midway during a project if you are using fabrics prone to linting.
- Don't stitch using the handwheel. That knocks your machine out of tension and can mess up the timing.
- Unplug your machine and keep it away from little fingers. Children may play with it when you're not around, and when you go to use it everything is off. Most kids know that your sewing machine isn't a toy for them, but all those buttons and knobs and that pedal are awful enticing for little ones.
- Take your machine in for regular cleanings and maitenence by a professional. It's work the money to keep your machine in top shape!
- Be careful not to drop your machine, and if it is on the ground, take care not to knock it or kick it.
As always, DON'T FORCEyour machine if it's stuck and always be gentle when troubleshooting. These tips are handy for sure, but if you're ever in doubt, TAKE YOUR MACHINE TO A PRO. It's always worth it.
Sources and Additional Information
What the Craft
Sewing at About.com
Wednesday, October 19, 2011
Lovely Frankenstein's 31 Days of Halloween: Pumpkin Carving Quilt!

Michelle over at Michelle's Romantic Tangle has got the cutest Jack o' Lantern Quilt ever! I love the goofy little faces. She has a tutorial over there complete with a video (fancy!). So if you want a cute quilt for next year, this is a good bet! CLICK HERE to get to the tutorial. Thanks for sharing, Michelle!
Tuesday, October 18, 2011
Lovely Frankenstein's 31 Days of Halloween: Free Applique Wall Hanging Pattern
Celebrate Halloween has got a really quick and cute Halloween wall hanging, perfect for a small space that needs just a touch of spooky. I would have loved this as a kid!
Find the free pattern HERE
Find the free pattern HERE
Lovely Frankenstein's 31 Days of Halloween: DIY Costume Ideas
It's getting closer and time to figure out costumes before the last minute. These website have some really fun and unique costume ideas that won't break your budget.
These are more on the geeky side of things, from Star Wars, to Tron to Legos to iPods.
This site has links to lots of costume ideas targeted mainly toward kids, but you could extrapolate and use the ideas for your own more adult version.
These are DEFINITELY more high tech type costumes that require more monies and more time. But they look pretty spectacular!
Good ol' Martha has lots of DIY costumes for adults amd most of them are pretty cool. My costume actually came from 2011's Martha Stewart Halloween Magazine.
Thread Banger's DIY Roundup this time is all about Halloween costumes! The Rubik's Cube is pretty cool
Costume Idea Zone. Pretty self-explanitory I think.
The Fun Times Guide has LOTS of links to sweet costume ideas, even those last minute ones!
Evil Mad Scientist Laboratories (sounds like our blogs are a match made in the Laboratory!) shows you how to make an awesome bat costume from a broken umbrella. It sounds cheesy...but it's cute!
Lovely Frankenstein's 31 Days of Halloween: Halloween Myths Debunked!
We all know the Halloween myths: There are razorblades in candy, criminals target more people on Halloween than any other night, black cats are stolen for dark ritual sacrifuce...but are any of them true?
CLICK HERE to learn about 13 of the most well known Halloween myths, and whether they're Truth or Crap!
CLICK HERE to learn about 13 of the most well known Halloween myths, and whether they're Truth or Crap!
Lovely Frankenstein's 31 Days of Halloween: Top 5 Favorite Halloween Themed Movies
5. Sweeney Todd. Gorey, slashy, Tim Burton-y musical of Halloween goodness. Alan Rickman is super creepy/skeezy in it.
4. Shadow of the Vampire. It's about the making of Nosferatu (my #2 pick) and it's bizarre as all get out.
3. While not a movie...Ghost Adventures. Zak is an ass but the data they get is intriguing.
2. Nosferatu: eine Symphonie des Grauens. Hands down the Freakiest movie I've seen yet, and it's a silent film from the 20s by FW Murnau. Not even Herzog's weird remake tops the eerieness of the original. I think it's the silence paired with the creepy imagery and how the ol' imagination goes on it's own.
1. Hocus Pocus!!! It's got Bette Midler, pre-Sex In The City Sarah Jessica Parker and pre-McGee from NCIS Sean Murray. Witches, curses and early 90s fashion sense. I saw this in theaters as a kid, and it's been a favorite ever since.
Hey Blogger, y u no do what I say?
Meme moment, got carried away.
But anyway, apparently my automated posts haven't been posting automatedly. Come on, Blogger, get on it wouldja?
Prepare for a flurry of catch up posts!
But anyway, apparently my automated posts haven't been posting automatedly. Come on, Blogger, get on it wouldja?
Prepare for a flurry of catch up posts!
Saturday, October 15, 2011
Lovely Frankenstein's 31 Days of Halloween: Los Liiiiiiinks! The Halloween Edition
Quilt Bug has several autumn and Halloween patterns available for sale and download...they're all very very cool! I love the Bat Magic one. Check out the wonderful Halloween and autumn patterns by clicking HERE!
There Goes the Block has a HUGE selection of free Halloween and autumn inspired patterns, and she's done a fabulous job of categorizing them. Seriously, you could spend an hour or more going through these. Visit the free pattern thread by clicking HERE!
BOM Quilts has collected free Block of the Month style Halloween projects put them in one place. See them HERE!
Friday, October 14, 2011
Lovely Frankenstein's 31 Days of Halloween: Free Debbie Mumm Pattern

What an adorable wall hanging from Debbie Mumm! This transitions easily between fall and Halloween, so if you want a fall quilt that's easily doable. Thank you for sharing the free pattern, Debbie!
CLICK HERE for the free pattern!
A quick project does the soul some good.
I have been SUPER stressed lately...I know, what else is new...but moreso than usual. I haven't had time to think much less sew, so needless to say all work and no sewing has made this girl rather dull. So apparently Mom took notice and hucked some fabric at me and a pattern and cried "mush!"
...actually she said something more like, "here, make this apron!" So I did. It took me 2 days, and that's only because I ran out of Bottom Line. Rat butts! Otherwise it probably only would have taken a couple hours, no biggie. The pattern is very easy and makes up real nass.


...actually she said something more like, "here, make this apron!" So I did. It took me 2 days, and that's only because I ran out of Bottom Line. Rat butts! Otherwise it probably only would have taken a couple hours, no biggie. The pattern is very easy and makes up real nass.

The Bistro Betty Pattern, by Busy Bee Quilt Designs. Included is the pattern for Barbecue Bob (not kidding!)

My roomate Lauren showing off the apron. But wait...

Oh yes...this baby is reversable with pockets on both sides!

Man I wish it fit me as nicely as the girl on the pattern! Still cute though :-)
Thursday, October 13, 2011
Why yes, I WILL be doing this.
A Lord of the Rings themed Block of the Month. For free. YES PLEASE.
Block 1 is Gandalf. Puh-LEASE let there be a Gimli block in there. "Toss me...but don't tell the Elf!"
Yes, yes, yes. I know my geek is showing.
CLICK HERE for this little nugget of quilt geek heaven at "Fandom in Stitches."
Block 1 is Gandalf. Puh-LEASE let there be a Gimli block in there. "Toss me...but don't tell the Elf!"
Yes, yes, yes. I know my geek is showing.
CLICK HERE for this little nugget of quilt geek heaven at "Fandom in Stitches."
Thursday, It's Technical: Quilt Backing Basics
Let's take a step back and take a good hard look at the matter and be completely honest with ourselves: Figuring and buying backing fabrics sucks. It does. There is a lot to consider for such a simple concept and it is unavoidable because quilts must have backing. So whether you're just beginning or you're just looking for a little refresher, here is how to make figuring and buying backing a little less blah.
Calculating your Backing Needs
1. Measure
 Your width is labeled as Y, your length as Z.
Y1 and Y2 should measure roughly the same, give or take .5", and same for Z1 and Z2. Yes, it is important to measure both sides, because sometimes our quilts just don't come out square.
If the sides are not the same as one another, take the average by adding the two together and dividing by 2. Ex.) Y1 + Y2 = ___. ____/2 = Width measurement. Use same method for length.
For the sake of example, let's say this quilt measures 55" x 70"
2. Add for the Quilter
IF you are taking your quilt out to be quilted by a professional longarmer, you need to add a few extra inches all the way around so the quilt can attach to their machine. If you are not, skip this step if you want, though, it is helpful even if you are quilting the quilt yourself, to have a little extra around the edges.
 The grey area with the dotted line represents your backing fabric. Note how it is extending past the edges of the quilt.
Determine how much extra fabric you need around the quilt. Most quilters ask for 4" extra all the way around, but be sure to ask.
Double the amount needed around the edges to account for the extra on both sides, and add to the width and length. Let's say the example quilt needs 4" extra. 4 x 2 = 8. 55 + 8 = 63 and 70 + 8 = 78.
With the amount needed for quilting added in, the quilt's new size is 63" x 78"
3. Do the Math
Do the math for both types of backing fabric - regular width and wide width. When you go shopping for your backing it'll help you estimate cost and guide your decision. I'm only going to do an example for regular width (~45") fabric. Oh, and when I describe the width of the fabric, I'm describing the selvedge to selvedge measurement...I'm sure you knew that all ready but I thought I'd make that distinction :) Also, as fabric costs rise, the selvedge to selvedge measurement will begin to shrink. We're all ready seeing widths closer to ~40" than ~45". Be sure to check the width of your backing fabric (listed on the bolt) before calculating for the average. If you are unsure of where to find it, ask your local quilt shop for help.
Now, if your quilt measures less than 40" either wide or long, you only need to account for the remaining size measurement and buy the yardage, no further calculation needed. Let's say your quilt is 38" x 38". Well, 38" fits one width selvedge to selvedge, which averages ~45". So you only need to calculate yardage for the remaining 38", which is just oiver a yard. Your local store will probably only sell in particular yard increments, so a 1 1/8yds would fit the bill. But what if your quilt is larger than one selvedge to selvedge width?
The example quilt measures 63" x 78" and we are backing it with ~45" wide fabric. Well, neither the width nor the length fit in to ~45", so we know now that we will need 2 widths of the fabric to cover the back, like so:
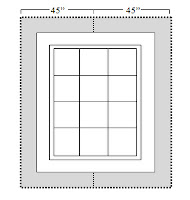 OR
OR
With ~45", you have ~90" total to work with, so choose the side that best fits the 90" with the least waste and that determines how your backing will be pieced. Generally horizonal piecing, like the second graphic, consumes less yardage because the longest side is accounted for with the selvedge to selvedge length and not the purchased yardage length, but as the quilt grows longer than 90" it ceases to be as cost effective. As I'll discuss later, the math works differently with wide backing. With wide backing you need to make sure that either the width or the length (either one) fits inside 108" and then calculate yardage for the remaining measurement.
But back to the math. Our quilt measures 63" x 78" and we have decided to piece the backing horizontally, like in the second picture above. Well, our length, 78" is accounted for in the ~90" we get out of pieceing the two 45" wide pieces. Done! Now all we need to do is determine our width yardage. So, our quilt is 63" wide and one yard is 36" long.
Divide the width by one yard: 63/36 = 1.75yd.
Remember, we need TWO equal pieces for this backing to cover the length of the quilt, so multiply your answer by 2: 1.75 x 2 = 3.5yd.
To back this quilt, we need 3.5 yards of standard width backing. If we choose to go with wide width, we need only 1.75 yards (enough for the width). How easy was that?
Choosing your Backing Fabric
Now that you have your backing requirements in your hot little hands, it's time to choose the fabric. I'm not going to get into color choice and pattern choice becausr that is so individually determined that I couldn't possibly begin to give any real pointers outside of what I do. Some people want their backing to match perfectly with the binding and with the front of the quilt, and others don't mind if it doesn't match 100%. Some people like to piece their backings so it's like a reversable quilt. That is all up to you, so I'll stick with the technicality.
This is the part that sucks, because yes...unless you are doing a baby quilt or smaller, it is spendy. You can choose bewteen regular width and wide backings like I mentioned before. Here are the pros and cons of each:
Regular Width Backing
Pros: A wide variety of color and pattern to match your quilt - high quality pieces available - regular price and Clearance priced options widely available - cost effective for full sized quilts and smaller - cheaper per yard than wide width - with quilt shop quality fabrics, there is no need to test for colorfastness
Cons: Unless your heart is set on a piece this is not cost effective for large quilts as you may need more than two selvedge to selvedge widths to account for even the shortest side - can produce a lot of waste - if your quilt is large you will have a seam running down the back of your quilt - piecing your backing can be an inconvenience or cumbersome for some people to manage for reasons of space or physical ability - if you choose a directional print, more yardage is required than usual depending n the direction the print is running
Wide Width Backing
Pros: Less yardage is required because of the larger selvedge to selvedge measurement - most cost efficient option for large quilts - blender style color schemes complement quilts nicely - no need to piece backing
Cons: Are not available everywhere - limited range of colors, really basics only - lower quality greigh goods than regular width are used so they tend to be rougher - notably more expensive than regular width - if used on a non-queen/king quilt, there is a very significant amount of waste - colorfastness can be an issue with red pieces - seldom found on Clearance
You also may want a different fiber other than cotton, which is what I have been talking about. The math and measuring is all the same, but consider your function:
Summer quilts tend to do better with cotton backings, and winter quilts tend to be more suited towards flannel. Kids like soft things so flannel or minkee are great for those quilts, but maybe not so much for an heirloom quilt. As your quilter before using Minkee, because it stretches and sheds they may decline to quilt your quilt with that backing. If it needs to be durable and long lasting, first and second run fabrics like those found at Walmart and JoAnn's aren't your best bet.
Buying backing is the pits, so buy backings during sales. Even if you don't know what size you need, it's cheaper overall to shell out the discounted money to get several yards of a good general backing to have in your stash for a future project. The Cotton Patch has a Backing Sale on the 30th of every month (in-store only...apologies to non-local readers!) that is mentioned with rules in our newsletters so we try and help with that (because we hate buying backings too). Save scraps to piece a backing to reduce cost too!
Everyone has their own way of doing things, so you may find a figuring methodology that works for you better than this, but I hope that helped clear up some of the backing problems and make the math easier, for beginners and experienced quilters alike!
Calculating your Backing Needs
1. Measure

Y1 and Y2 should measure roughly the same, give or take .5", and same for Z1 and Z2. Yes, it is important to measure both sides, because sometimes our quilts just don't come out square.
If the sides are not the same as one another, take the average by adding the two together and dividing by 2. Ex.) Y1 + Y2 = ___. ____/2 = Width measurement. Use same method for length.
For the sake of example, let's say this quilt measures 55" x 70"
2. Add for the Quilter
IF you are taking your quilt out to be quilted by a professional longarmer, you need to add a few extra inches all the way around so the quilt can attach to their machine. If you are not, skip this step if you want, though, it is helpful even if you are quilting the quilt yourself, to have a little extra around the edges.

Determine how much extra fabric you need around the quilt. Most quilters ask for 4" extra all the way around, but be sure to ask.
Double the amount needed around the edges to account for the extra on both sides, and add to the width and length. Let's say the example quilt needs 4" extra. 4 x 2 = 8. 55 + 8 = 63 and 70 + 8 = 78.
With the amount needed for quilting added in, the quilt's new size is 63" x 78"
3. Do the Math
Do the math for both types of backing fabric - regular width and wide width. When you go shopping for your backing it'll help you estimate cost and guide your decision. I'm only going to do an example for regular width (~45") fabric. Oh, and when I describe the width of the fabric, I'm describing the selvedge to selvedge measurement...I'm sure you knew that all ready but I thought I'd make that distinction :) Also, as fabric costs rise, the selvedge to selvedge measurement will begin to shrink. We're all ready seeing widths closer to ~40" than ~45". Be sure to check the width of your backing fabric (listed on the bolt) before calculating for the average. If you are unsure of where to find it, ask your local quilt shop for help.
Now, if your quilt measures less than 40" either wide or long, you only need to account for the remaining size measurement and buy the yardage, no further calculation needed. Let's say your quilt is 38" x 38". Well, 38" fits one width selvedge to selvedge, which averages ~45". So you only need to calculate yardage for the remaining 38", which is just oiver a yard. Your local store will probably only sell in particular yard increments, so a 1 1/8yds would fit the bill. But what if your quilt is larger than one selvedge to selvedge width?
The example quilt measures 63" x 78" and we are backing it with ~45" wide fabric. Well, neither the width nor the length fit in to ~45", so we know now that we will need 2 widths of the fabric to cover the back, like so:


With ~45", you have ~90" total to work with, so choose the side that best fits the 90" with the least waste and that determines how your backing will be pieced. Generally horizonal piecing, like the second graphic, consumes less yardage because the longest side is accounted for with the selvedge to selvedge length and not the purchased yardage length, but as the quilt grows longer than 90" it ceases to be as cost effective. As I'll discuss later, the math works differently with wide backing. With wide backing you need to make sure that either the width or the length (either one) fits inside 108" and then calculate yardage for the remaining measurement.
But back to the math. Our quilt measures 63" x 78" and we have decided to piece the backing horizontally, like in the second picture above. Well, our length, 78" is accounted for in the ~90" we get out of pieceing the two 45" wide pieces. Done! Now all we need to do is determine our width yardage. So, our quilt is 63" wide and one yard is 36" long.
Divide the width by one yard: 63/36 = 1.75yd.
Remember, we need TWO equal pieces for this backing to cover the length of the quilt, so multiply your answer by 2: 1.75 x 2 = 3.5yd.
To back this quilt, we need 3.5 yards of standard width backing. If we choose to go with wide width, we need only 1.75 yards (enough for the width). How easy was that?
Choosing your Backing Fabric
Now that you have your backing requirements in your hot little hands, it's time to choose the fabric. I'm not going to get into color choice and pattern choice becausr that is so individually determined that I couldn't possibly begin to give any real pointers outside of what I do. Some people want their backing to match perfectly with the binding and with the front of the quilt, and others don't mind if it doesn't match 100%. Some people like to piece their backings so it's like a reversable quilt. That is all up to you, so I'll stick with the technicality.
This is the part that sucks, because yes...unless you are doing a baby quilt or smaller, it is spendy. You can choose bewteen regular width and wide backings like I mentioned before. Here are the pros and cons of each:
Regular Width Backing
Pros: A wide variety of color and pattern to match your quilt - high quality pieces available - regular price and Clearance priced options widely available - cost effective for full sized quilts and smaller - cheaper per yard than wide width - with quilt shop quality fabrics, there is no need to test for colorfastness
Cons: Unless your heart is set on a piece this is not cost effective for large quilts as you may need more than two selvedge to selvedge widths to account for even the shortest side - can produce a lot of waste - if your quilt is large you will have a seam running down the back of your quilt - piecing your backing can be an inconvenience or cumbersome for some people to manage for reasons of space or physical ability - if you choose a directional print, more yardage is required than usual depending n the direction the print is running
Wide Width Backing
Pros: Less yardage is required because of the larger selvedge to selvedge measurement - most cost efficient option for large quilts - blender style color schemes complement quilts nicely - no need to piece backing
Cons: Are not available everywhere - limited range of colors, really basics only - lower quality greigh goods than regular width are used so they tend to be rougher - notably more expensive than regular width - if used on a non-queen/king quilt, there is a very significant amount of waste - colorfastness can be an issue with red pieces - seldom found on Clearance
You also may want a different fiber other than cotton, which is what I have been talking about. The math and measuring is all the same, but consider your function:
Summer quilts tend to do better with cotton backings, and winter quilts tend to be more suited towards flannel. Kids like soft things so flannel or minkee are great for those quilts, but maybe not so much for an heirloom quilt. As your quilter before using Minkee, because it stretches and sheds they may decline to quilt your quilt with that backing. If it needs to be durable and long lasting, first and second run fabrics like those found at Walmart and JoAnn's aren't your best bet.
Buying backing is the pits, so buy backings during sales. Even if you don't know what size you need, it's cheaper overall to shell out the discounted money to get several yards of a good general backing to have in your stash for a future project. The Cotton Patch has a Backing Sale on the 30th of every month (in-store only...apologies to non-local readers!) that is mentioned with rules in our newsletters so we try and help with that (because we hate buying backings too). Save scraps to piece a backing to reduce cost too!
Everyone has their own way of doing things, so you may find a figuring methodology that works for you better than this, but I hope that helped clear up some of the backing problems and make the math easier, for beginners and experienced quilters alike!
Lovely Frankenstein's 31 Days of Halloween: Bat Mobile
...and a high five to anyone who immediately thought "Batman! Na Na Nana Na Na Nana Na Na Nana Nana Nana Batmaaaan!!!" I digress.
This is a really cute little mobile with hanging bats that would be a perfect project to do with kids, or to hang for a whimsical touch to your Halloween decor. It's also a great use for scraps of leftover Halloween prints! Follow their directions of course, but you could make this as large as you want. Thanks to Liz at Sew 4 Home! CLICK HERE for the pattern and Tute!
This is a really cute little mobile with hanging bats that would be a perfect project to do with kids, or to hang for a whimsical touch to your Halloween decor. It's also a great use for scraps of leftover Halloween prints! Follow their directions of course, but you could make this as large as you want. Thanks to Liz at Sew 4 Home! CLICK HERE for the pattern and Tute!
Wednesday, October 12, 2011
Lovely Frankenstein's 31 Days of Halloween: Spiderweb Tablerunner Tutorial

I love textural tablerunners, and this lovely spiderweb tablerunner from The Crafty Cupboard delivers. Use felt or wool for your spiderweb, and fabric of your choice to put behind it. Neat!
CLICK HERE for the tutorial. Thanks Melanie!
Tuesday, October 11, 2011
Walking the Quilting Walk, Literally.

I saw these on ASG's Chicago Chapter website (it's neat, check it out HERE). Fashion rock star Alexander McQueen did a series of art pieces featuring common household items, and these babies were part of the series. All I know is these are some sweet kicks and if these were wearable...Oh, there were some neat Iron ones too
I guess for the time being I'll just have to settle for my Lovely Frankenstein shoes!

The Double Sided Needle
Sew Oregon is in full swing and WOW have we been busy! Hello and thank you to all the wonderful shop hoppers from all over! It's been a blast visiting with you :-)
So in case you're wondering, "Hey, Lauren...why all the Halloween posts and no quilting posts?" that is because I've been so busy with store stuff I have had zero time to work on projects and get articles posted. I begrudgingly admit that the Halloween posts are getting automated and are through the end of the month, because I know I don't have a lot of time right now to dedicate to for real blogging.
Once Sew Oregon is over, Mom and I are venturing over to Houston, TX for the International Quilt Market - Waffle Houses beware! Quilts and hashbrowns...heaven? Yes. But anyway, time is so limited that my quiltiong posts are few and a bit far between this month. I'll try and get some new ones up and automate them out, but I can't promise. But I hope the Halloween stuff is entertaining and inspiring you as much as it does me!
Happy quilting, everyone!
Monday, October 10, 2011
Lovely Frankenstein's 31 Days of Halloween: Where did Halloween Come from?

***Halloween has, in some religious and cultural communities, a profoundly negative reputation. This article seeks to be as neutral and respectful as possible in this regard. I will be making no personal judgement calls as I talk about different religious and spiritual belief systems regardless of they connotations they hold in Western society. I ask that is you choose to comment, that all comments be kept respectful for all.***
Yes, as though it weren't completely obvious, I'm a Halloween fanatic. Why? I think for me it's a mixture of things: I've always liked things that are a bit off color, a little weird and not what most people are drawn to. That I can't explain. Ever since I was a little kid I've been attracted to Halloween, that is, as soon as my Mom explained to me that mummies can't come back from the dead and eat you. Yes, I even liked Egyptian mummies as a little kid too. What can I say, I've always been weird :-) But after Mom cleared that little detail up, Halloween was my thing. October fall is one of my favorite times of year; it's not cold, but there is a definite chill in the air, and the air itself smells like fallen leaves. Yankee Candle, your "Autumn" smell has nothing on the real McCoy. But that late October by nature has a kind of spooky feel as everything just begins to transition to winter. The trees are almost bare, the foliage is dying, animals begin to hibernate, and the migratory birds are mostly gone. It's weirdly quiet, it's just a little creepy by nature, and I have always liked that. Again, there's no explanation for it, it just is what it is. But all of the Halloween things - the monsters, the pumpkins, the paranormal, the trick or treating (and now that I'm just a kid at heart, the trick or treaters), the thrill of being scared but in no real danger, the chance to for one day be something you could never be even with the help of the most advanced science, the entertaining, the tomfoolery, the cute, the funny, the dark and the scary - everything (well, everything non criminal), it appeals to me and gives me joy.
But much unlike other holidays and observances such as Christmas, Hannukah, Easter, or Ramadan, not much thought is given to the origins of Halloween and why we celebrate it much less why some of us love it. Depending on who you ask, Halloween is either a commercial candy company holiday, a dark devil-worshippy holiday or it's just a holiday made up so people have an excuse to dress up and act fools in a socially acceptable context. But even for a Halloween nut like me, the origins of the holiday and why it's as widespread as it is, is a little bit mysterious. I suppose that's also part of the appeal for many people - we don't know WHY we celebrate it with ghosts and bats and pumpkins, we just do! But here is a little bit of history into the origins of Halloween.
Halloween can be, at its earliest, loosely attributed to Celtic Pagan observance of Samhain (pronounced SOW-inn), the Feast of the Dead, though this prospect is the subject of debate through the historical and religious communities. In Celtic Pagan belief, the Feast of the Dead is to honor and celebrate those who have passed - for them, it was not a morbid affair - and it was believed that the barrier between the living world and the spirit world is the thinnest at the end of October and beginning of November. The Feast of the Dead is held to allow the spirits of loved ones when they are most able to pass between world to celebrate with those who are still living. With the spirits present, it was believed that they brought knowledge of the future. Druid priests would try to determine the future, and the Pagan at the celebration would dress up and try to tell each others fortunes for entertainment. Though death and the dead were the focus of this celebration, it wasn't not all about spirits. For the Pagans, death symbolized transition and changes in ones life, and Samhain was the time to take stock of one's life and consider the changes that have occurred or that must be made. Modern day Pagans still celebrate this holiday, though the rituals and observances have altered to reflect their culture changes over the years.
Over hundreds of years, the Celtic tradition of Samhain became subject to the burgeoning Catholic influence over the region, much as the Celtic people themselves. Samhain was replaced by a the Christian paradigm in the form of All Hallows Eve (October 31), All Saint's Day (November 1), and All Souls Day (November 2). The Church retained the timing of Samhain while replacing the spirits and fortune telling with Catholic stories and practices. The Halloween we know is a combination of all three. All Hallows Eve is when the souls lost to Purgatory were said to roam the earth, and so fires were lit to keep the spirits at bay. All Saints Day was a day of observance for the Saints who died as matryrs in the name of Jesus Christ and the Church. All Souls say was the day of prayer for the souls all of the dead. As time progressed, ouside of the Catholic Church, the three days of observance were combined into one Halloween.
So then knowing that, why do we dress up, hand out candy, and willingly surround ourselves with all things spooky? Well, those Halloween traditions are a story for another day.
Lovely Frankenstein's 31 Days of Halloween: Printable Poster
Craftily Ever After is another really good craft blog and Jessica has got a great printable poster perfect for your Halloween home and parties.
You know those "Keep calm and Carry On" posters? It's like that, only it's this:

Yeah. How cool is that?! I all ready have mine printed out and it's ready to get put in a spooky frame I found and get set for the Halloween Cocktail party. Get yours HERE. Thanks Jessica!
You know those "Keep calm and Carry On" posters? It's like that, only it's this:

Yeah. How cool is that?! I all ready have mine printed out and it's ready to get put in a spooky frame I found and get set for the Halloween Cocktail party. Get yours HERE. Thanks Jessica!
Saturday, October 8, 2011

Friday, October 7, 2011
Lovely Frankenstein's 31 Days of Halloween: Eyeball Wreath
Here's another creepy one from A Pretty Life in the Suburbs.

Though, today it seems like it's a pretty spooky life in the suburbs when people see this fun and strange wreath hanging up! I absolutely love it! how great would that look in a mad scientist themed haunted house? Hmm... I'd make it if I had more time, but this month time is really, really limited so I think it'll have to wait until next year.
This would be fun to make with kids, if they're of the Halloweenish persuasion!
CLICK HERE for the How-To. Thanks Joanna!
Thursday, October 6, 2011
Thursday, it's Technical: Choosing the Right Thread for the Job
Thread is one of those things that, unless we're choosing it for the top quilting, we don't think about much. We have "our thread" and we like what we like and that's what we use. Me? I tend to stay with Guterman 50wt. black in the top thread, and that, or Superior Bottom Line gray in the bobbin. I vary very little from that, but I'm starting to find that yeah, I really do need to change it up sometimes depending on what I'm doing. But honestly, I didn't know how I should be changing my threads and why, so I did a little bit of research about the different threads, when and why they're used. I hope you find this as helpful as I did!
Thread Basics 101
Thread Weights
Yes, just like wire, thread comes in "gauges," referred to as the thread's weight. The higher the number, the finer the thread. A good middle weight thread, and most commonly available is 50wt. and it will get the job done with most moderate thickness fabrics, like flannel, cotton, batik. 60wt. is more intended for bobbin thread, or sewing with lightweight fabrics like chiffon. A 40wt. thread is best served for things like cordouroy, canvas, and denim; its thickness will prevent it from breaking as it is pushed through the heavier fabrics.
Cotton
Cotton really is your go-to thread. It works well for most projects, is quite durable and comes in every color under the sun and is reasonably priced. Cotton thread is "Mercerized" meaning it has undergone a process to give it smoothness and a bit of luster and it accepts dye well. It is always wise to use thread to match your fabric, since with lower quality threads (as with fabric) the dye can bleed. It is good to use when you're sewing cottons, rayons or linens. Cotton has very little give to it, so if you're sewing knits or anything in which you need to retain stretch in the seams, cotton is not the right thread for the job.
Polyester
Polyester is widely available, and the subject of hot thread debate (who knew?). There are some who swear by polyester and who will use nothing but, and there are others who completely refuse to use the stuff. I suppose it comes down to personal preference, as with most things, but consider your purpose. Polyester doesn't shrink or fade, because it is a synthetic fiber, and as such it is intended for use with other synthetic fibers. It works well with knits, polyester, and cotton.
Rayon
It is lustrous and a great thread for decorative stitching. It is a synthetic fiber with little give, so it's not suited to anything with stretch (unless in the capacity of embellishment, not seams). It does have a tendency to slip out of machine needles and break, so it can be a little trying in the patience department, but the effect is worth it. It can be used in seams in a pinch, but it's not really the best choice for the piecing work.
Nylon/Monofilament
Nylon thread is meant for synthetics when used in a seam. It is mainly used for top quilting, as it is "invisible" and very forgiving as it embeds in the fabric well to hide stitching errors. While after completion it is very strong, it can snap when sewn in too fast. Some nylons are iron safe, and some are not - it depends greatly on quality and whether they are coated with another heat-safe substance or not. Use a Metallics needle for best results in a sewing machine.
Silk
Silk is perfect for hand applique. It hides well in the fabric and glides through the pieces like a dream. It is on the spendy side, though. It is best suited for "luxury" fabrics because of its cost and its natural sheen. It is also very strong, but you will also find a more limited array of color. It also works well for garments, because it can easily be hidden and it isn't bulky.
Wool
Wool thread is meant less for seams and more for embellsihment and hand applique. The common wool traits are applicable here - it is thicker, coarser and more expensive than your usualy cotton or polyester. You can use them in a machine, but you will need a larger eye for your needle and they fuzz like crazy, so clean out your bobbin case regularly.
Metallics
These are meant for embellishment and top quilting only. It snaps easily, making it a beast to work with, so this is not at all suitable for seamwork - besisde, you won't see that gorgeous shine in a seam anyway. These have a very striking effect on a quilt or garment, but can over power too. To cut down on snapping, use a Metallic needle in your machine for best results.
Considerations
As with all choices in material you can make, consider your purpose. Choose a thread that is best suited to what you're doing and how your item will be treated. Take into consideration the type of fabric you're sewing and its strength versus the strength of the thread - if they are too different in durability, the thread can wear through the fabric over time and create holes, or the wear on the fabric will snap the thread. Needle Pointers suggests that you choose a thread of the same matrial as your fabnric, and the same size as the weave of the fabric to ensure equality in strength. They also suggest, if equality isn't possible, to choose a thread weaker than the fabric - a broken thread is easier to repair than shredded fabric. Always test for colorfastness and be aware of how it will shrink in the wash versus your fabric. If it shrinks more, then it will create puckers which gives a quilt a more antique look. If it shrinks less, the puckers aren't created. Do you want your stitches to show or not? If you do, use a contrasting color or a thread with a different luster than your fabric; if not, choose the same color or luster as your fabric.
Remember, just like fabric, you get what you pay for. While 5 for $1 thread is a bargain for your wallet, it is as cheap as it is inexpensive, and unless it is a major brand on markdown, it will tend to snap, stretch, shrink, fray, fade, and ravel more than the higher quality (and higher cost) threads which will in turn affect the quality of your work. There are many high quality threads out there, and you have to try several to find what you like and what your machine likes best. I prefer Guetermann or Presencia for my top thread, and Superior Bottom Line for my bobbin thread for piecing and applique (we have these at the shop). I'm really partial to Superior Monofilament and Sulky Holoshimmer for decorative quilting. You'll have to find your thread brand of choice for yourself and change up your fiber content for the project at hand.
Sources and More Information
All Free Crafts' article on Thread
Textiles in Depth
eHow
Needle Pointers - explore this one...there is A LOT of information.
Best Sewing Machines' Thread Tips
Lovely Frankenstien's 31 Days of Halloween: Make Shrunken Heads from Apples
Because I love ALL things Halloween, from the adorable to the creepy, from the lighthearted to the downright scary, this post caters to the creepier side of the spectrum.
Now, if you're like me, then you like your Halloween decor a little more macabre than the average ghoul (yeah, I went there). CLICK HERE to get to the Craft Bits Halloween page (an excellent project resource, by the way) to find out how to make creepy shrunken heads (if you don't know what a shrunken head is, or what one looks like, I invite you to Google it yourself...it's a little on the freaky side to see) from little more than an apple and some lemon juice. Aside from the not being real heads, they're pretty convincing! I'll be making a few of these for my upcoming Halloween Cocktail party.
Now, if you're like me, then you like your Halloween decor a little more macabre than the average ghoul (yeah, I went there). CLICK HERE to get to the Craft Bits Halloween page (an excellent project resource, by the way) to find out how to make creepy shrunken heads (if you don't know what a shrunken head is, or what one looks like, I invite you to Google it yourself...it's a little on the freaky side to see) from little more than an apple and some lemon juice. Aside from the not being real heads, they're pretty convincing! I'll be making a few of these for my upcoming Halloween Cocktail party.
Wednesday, October 5, 2011
Lovely Frankenstein's 31 Days of Halloween: Free Stitchery Pattern
Well, I can't post a picture of this because of Copyright settings on the JMD website (which of course is fine) but this cute little wallhanging says "Having Nothing to Stitch is Scary!" ....and it's right!
CLICK HERE to see the quilt, and CLICK HERE for the pattern PDF.
Pattern is by Janet M. Davies for JMD Designs in New Zealand. Great project, Janet - thank you for sharing!
CLICK HERE to see the quilt, and CLICK HERE for the pattern PDF.
Pattern is by Janet M. Davies for JMD Designs in New Zealand. Great project, Janet - thank you for sharing!
Tuesday, October 4, 2011
Lovely Frankenstein's 31 Days of Halloween: Night on Bald Mountain
This is taken from Fantasia (1940), and it is part of the last segment entitled "Night on Bald Mountain." It tells the tale of darkness being defeated by light - It begins with Modest Mussorgsky's (1839-1881) "Night on Bald Mountain" composition, filled with ghosts, ghouls, demons and witches terrorizing a small mountain town by night, and the then trandsitioning into "Ave Maria" at sun up, where the forces of the good and holy banish the demons of the night. Considering it was made by Disney in 1940, the beginning is pretty dark and, for kids, pretty scary.
Now, since it's 31 Days of Halloween, I am just playing the Mussorgsky half and omitting the Ave Maria (beautiful though it is). So, on to the spooky and scary 1940s Night on Bald Mountain!
Now, since it's 31 Days of Halloween, I am just playing the Mussorgsky half and omitting the Ave Maria (beautiful though it is). So, on to the spooky and scary 1940s Night on Bald Mountain!
Shop Hop: Sew Oregon 2011
Sew Oregon is just about here! We (The Cotton Patch) along with 49 other wonderful Oregon quilt stores, will be participating in this shop hop. Click on the Sew Oregon link to view more details on the official website but for those unfamiliar with shop hops and Sew Oregon, I'll give a little explanation.
A shop hop is an extended event held by regional quilt stores, usually lasting 2-3 weeks, where free quilt blocks are offered using 1 or more common fabrics between shops. Customers can travel shop to shop to get a free block at each one, and to shop in their store As you accumulate these free blocks, depending on how many shops you choose to visit, you will be able to make a quilt commemorating your trip. The free blocks give you incentive to get out to store you otherwise don't visit often, and it's a great way to get out of twon with friends.

Now for the boring rules and regulations. Every store has their own rules as far as passports go. The Cotton Patch's rules are as follows:
- One Passport stamp per customer.
- You must be present to recieve stamps, either in-store or visibly waiting in the car. We will not stamp Passports for friends who are not present. Even if a store you've already visited stamped multiple Passports for you, we are not required to do the same.
- We always ask if your companions with Passports are quilters as well. We do not give stamps to children or to tag-a-long husbands who are along for the ride but don't quilt - stamps go to quilters only and we allow only one Passport per quilter. Even if a previous store stamped their Passports, again, we are not required to do so as well.
- We don't discriminate; we will give stamps to young and male quilters, but as stated before, we will ask.
Every year Sew Oregon is an absolute blast. I'll be going around to a few shops, on what will be my very first shop hop, with my friend Isabelle. It's going to be a lot of fun! I know us gals at the shop can't wait to see all of our regulars and the new faces that Sew Oregon brings, and I'm excited to see (and buy) the wonderful things our local quilt shops have to offer!
See you on the hop!
Monday, October 3, 2011
Lovely Frankenstein's 31 Days of Halloween: Origin of the Jack o' Lantern


Well, the term "Jack o' Lantern" was orginally used to describe a night watchman carry a lantern, with the earliest known use of the term popping up East Anglia in the mid 1600s. This soon became a more general term for any man carry a lantern at night. Outside of East Anglia, the term became synonymous with Will o' the Wisp phenomena (left).
So where does the carving aspect of the Jack o' Lantern tradition come from? Well, there are many different tellings of the story from cultures all over the world, but the one most often associated with western Halloween traditions is that of Stingy Jack. As with any oral tradition, there are many variations told on the story, but the most commonly told version is as follows:
Stingy Jack was a miserable, old drunk who liked to play malicious tricks on everyone he knew: family, friends, and strangers alike. One day Jack was getting chased by some villagers from whom he had stolen. As he ran, he met the Devil who claimed it was his time to die and that he had come for his soul. Despite his age and constant drunkeness, Jack was a clever man and thought of a way to stall his death and therefore his trip to Hell. He tempting the Devil himself with a chance to trick the church-going villagers chasing him into granting him their souls - giving the Devil more souls to drag to Hell than just his own. Knowing the Devil could take any shape he chose, he told the Devil to turn into a coin with which he would pay for the stolen goods, and then the Devil could take his form back after the debt had been paid. When the coin disappeared after the Devil took his original form, the Christian villagers would fight over who had stolen it, and by accepting the Devil as payment they implied the promise of their souls to him. The Devil, eager to take more souls with him, agreed to Jack's plan. He turned himself into a silver coin and jumped into Jack's wallet, only to find himself next to a cross Jack had also stolen from the villagers. Before the Devil could change his form to punish Jack for tricking him, Jack had closed the wallet tight.The holy cross stripped the Devil of his powers and so he was trapped, the Devil himself subject to Jack's decision to end the trick.
After much argument, Stingy Jack conceded to end the trick and free the Devil, but on one condition: Devil must promise him not to take his soul to Hell when he died. Begrudgingly, the Devil promised not to take his soul and so Jack stayed good to his word, removed the holy cross and let the Devil out to return to Hell without him.
Many years later, Jack finally succumbed to old age and hard living and passed away with little sorrow from the village and his family. He went to the gates of Heaven and demanded entry. Saint Peter rejected his demands, and said that he was far too mean and cruel, and had led a miserable and worthless life on Earth without repentence and was therefore unfit to enter the kingdom of God. Jack turned around and journeyed down to Hell to meet with the Devil that he had tricked so many years ago. Jack demanded that he be let in to Hell after being rejected from Heaven, but the Devil kept his promise and would not allow him to enter Hell.
Having been rejected from both Heaven and Hell, Jack was scared and had nowhere to go but to wander for the rest of eternity through the darkness between Heaven and Hell. frustrated and destitute, he asked the Devil how he could leave Hell too, as there was no light for him to find his way by. The Devil laughed at his misfortune, and mockingly tossed him a single ember from the flames of Hell to help him light his way. Taking pity on Jack's soul, God gave him a hollowed out turnip in which to carry the single ember. From that day onward, Stingy Jack roamed the Earth without a resting place, unwelcome in Heaven and in Hell, lighting his way with his eternally glowing turnip and was known as "Jack of the Lantern" - Jack o' Lantern.
Replicating the story of Stingy Jack, young men started carving turnips and pumpkins to scare travellers into thinking they had met Jack of the Lantern. Children carried the craved gourds to represent the trapped souls of loved ones in Purgatory on All Saints Day and All Souls Day. From there it became a tradition to carve and light the gourds and over the years it became less religious and mischievous and more decorative and indicative of Halloween.
So there we have it! The origins of the Jack o' Lantern. Pretty neat, huh?
Sunday, October 2, 2011

Saturday, October 1, 2011
Lovely Frankenstein's 31 Days of Halloween: Free Halloween Door Hanger Pattern

or, get right down to the nitty gritty and go directly to the free pattern:
The Lovely Frankenstein Quilting Laboratory Special
Take a deep breath, temperate climate countries of the Northern Hemisphere...do you smell it? That's fall you smell our there my dears - the slight chill in the air, the light musty scent of fallen leaves...wonderful, isn't it? But there's something else lingering in the fall air...something...spooky.
Oh my pretties, it's the Halloween season...my favorite season of all! (as thought you couldn't tell by the Halloween themed blog). This year I'm doing something special in honor of my favorite holiday: This month kicks off the first Lovely Frankenstein's 31 Days of Halloween. That means every day there will be something Halloween related - free projects, decorating ideas for outside and in the home, costume ideas, Halloween trivia and all that great stuff.
So I hope you join me for Lovely Frankenstein's 31 Days of Halloween...if you dare!
Subscribe to:
Posts (Atom)